Engineers who search for how to make a mini scissor lift need a clear link between theory and buildable hardware. This article walks through core scissor mechanism principles, linkage geometry, and stability so you can size links, actuators, and frames with confidence.
You will see how kinematics, screw or hydraulic layouts, and load paths set real-world limits on lift height, torque demand, and platform capacity. Later sections translate standards, OSHA rules, and design codes into practical limits for DIY mini lifts, including guardrails, testing, and maintenance practices.
Core Principles Of Mini Scissor Lift Mechanisms

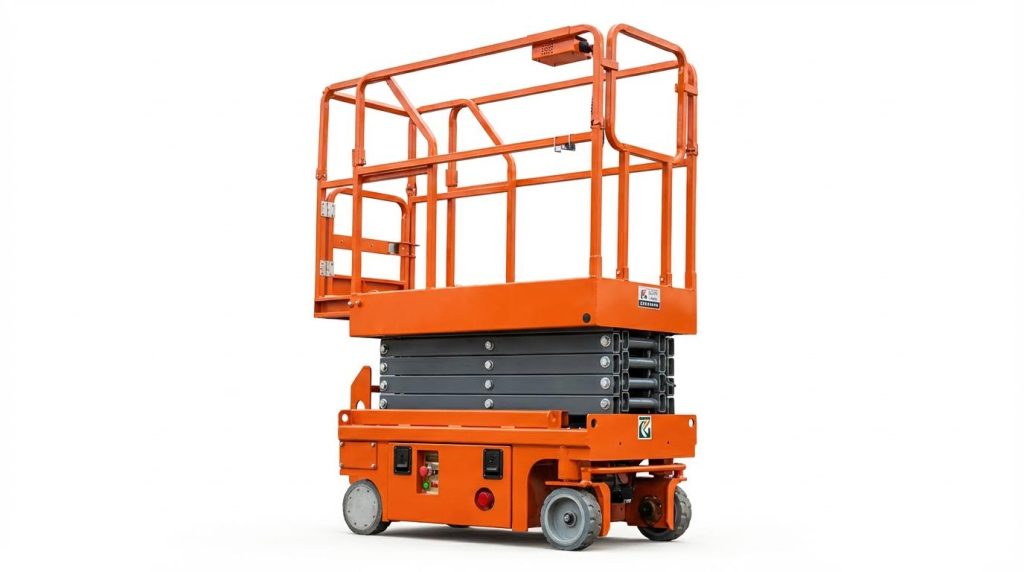
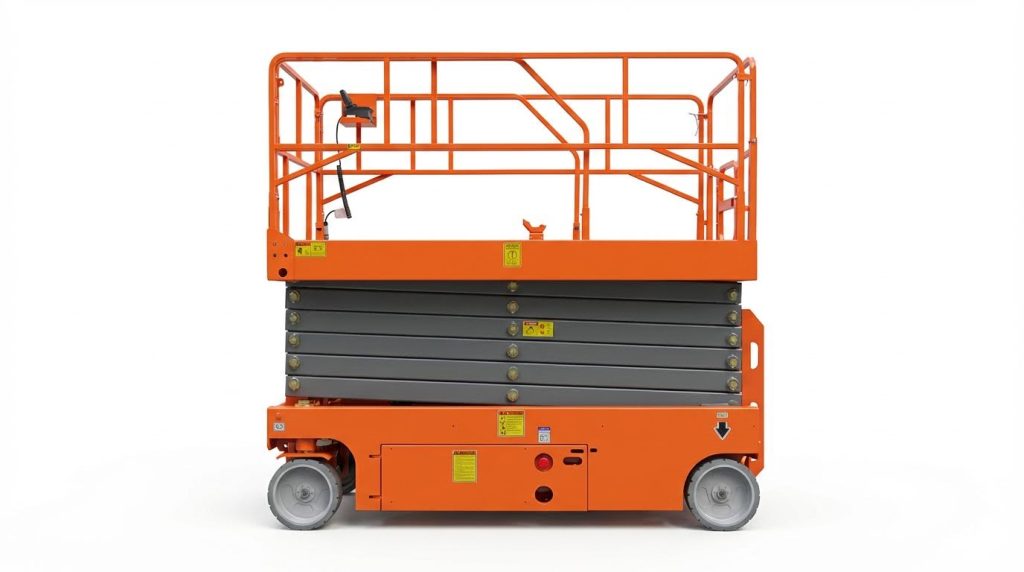
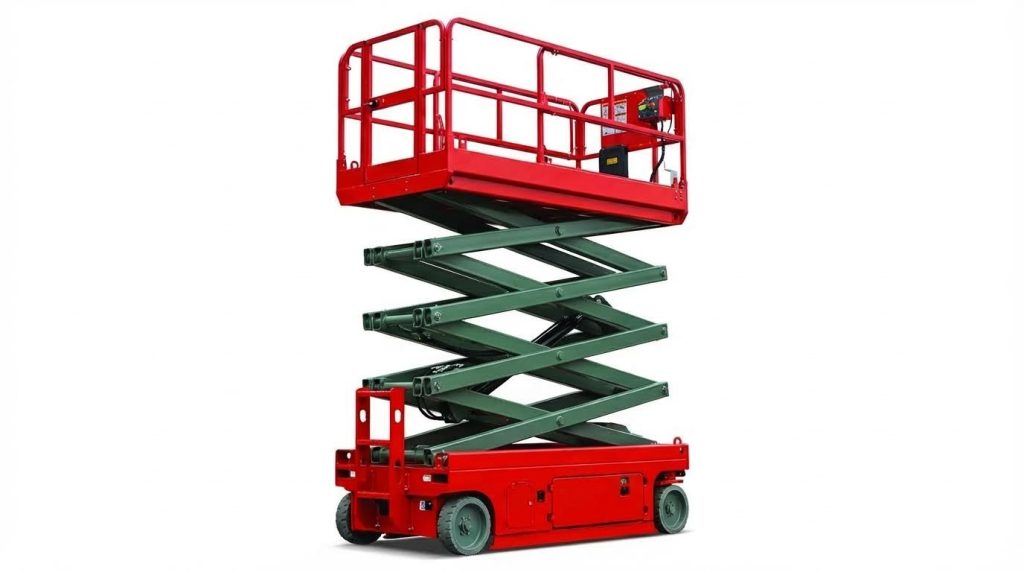
Core principles guide how to make a mini scissor lift that is compact, stable, and safe. A designer must understand linkage motion, actuator choice, load paths, and regulatory limits before sizing any parts. These concepts apply to small bench-top lifts as well as compact mobile platforms for tight aisles or workshops.
Basic Kinematics Of Single-Stage Scissor Systems
A single-stage scissor lift uses two pairs of links that cross like an “X”. The platform height depends mainly on link length and the angle between each link and the base. At small angles, a small change in base length produces a large height change and very high internal forces. Near mid-stroke, motion is smoother and forces are lower. When planning how to make a mini scissor lift, define target collapsed height, extended height, and base length range first. Then derive the relation between base width and lift height using simple trigonometry on a symmetric four-bar model.
| Parameter | Design meaning |
|---|---|
| Link length L | Sets maximum height for a given number of “X” stages |
| Link angle θ | Angle between link and base; controls height and mechanical advantage |
| Base width b | Horizontal distance between lower pivots; controlled by actuator |
| Height h | For one “X”, h≈L·sinθ (ideal no-clearance model) |
Actuation Options: Screw, Hydraulic, And Electric Drives
Mini scissor lifts usually rely on three actuation families. A screw drive is common in DIY builds because it is simple, compact, and self-locking if friction is high. Hydraulic cylinders give smooth motion and high force in small packages but need a pump, hoses, and seals. Electric linear actuators combine an electric motor and screw in one unit and suit light loads and short duty cycles.
For a small bench or service lift, designers often compare options using these points:
- Screw jacks suit loads up to a few kilonewtons with low lift speed.
- Hydraulics fit higher loads and frequent cycles but add cost and maintenance.
- Electric actuators simplify wiring but limit stroke speed and duty cycle.
When deciding how to make a mini scissor lift at home, a single central screw between lower pivots is usually the most practical solution.
Load Paths, Mechanical Advantage, And Efficiency
Vertical load from the platform travels through the upper pivots, down each link, and into the base pivots. The links mainly see axial compression and some bending from clearances and off-center loads. Mechanical advantage depends strongly on link angle. Near fully collapsed, small actuator force creates large lift force but with high internal link compression and high screw torque. Near full extension, mechanical advantage drops and required actuator force rises.
For a screw-driven mini scissor lift, the design steps usually include:
- Compute required vertical force from mass and gravity: Fw = m·g.
- Use free-body diagrams to find horizontal force between lower pivots at several heights.
- Convert horizontal force to screw torque using pitch and friction.
- Check that user handle force or motor torque stays within realistic limits.
Overall efficiency depends on joint friction, screw efficiency, and any hydraulic or electric losses. Typical power screws show efficiencies around 30%–60%, while simple hydraulic systems often reach 70%–85% if well maintained.
Standards, Codes, And Regulatory Constraints
Even small DIY lifts must respect basic safety rules. Regulatory bodies required guardrails and fall protection on work platforms, as described in OSHA sections 29 CFR 1926.451 and 1910.29. Designers also had to observe limits on outdoor wind use for mobile scissor lifts, typically below about 13 m/s, and maintain firm, level support surfaces. For electrically powered mini lifts, clearances from live conductors and operator training followed rules in 29 CFR 1910.269, 1910.333, and related parts.
Global product standards such as ISO, ASME, and ANSI defined load testing, structural factors of safety, and labeling practices for lifting equipment. Even if a home-built mini scissor lift was not certified, these documents gave useful reference values for test loads, proof tests, and inspection intervals. A safe design process included load tests, no-load and full-load functional checks, and periodic inspection for cracks, loose pins, and worn screws before regular use.
Linkage Geometry, Stability, And Performance

Anyone asking how to make a mini scissor lift must first understand linkage geometry and stability. This section explains how symmetric link layouts set height and stroke, how actuator and screw placement drive torque demand, and how to check buckling and deflection. It also covers stability on slopes, under wind, and on imperfect floors so DIY designs stay safe in real use.
Symmetric Linkage Geometry And Height–Stroke Relations
A symmetric scissor uses equal link lengths and mirrored pivots about the center line. This geometry keeps the platform level and the vertical load shared between both sides. For a single stage with link length L and link angle θ to the horizontal, the ideal lift height H is approximately H = 2·L·sin(θ). The horizontal base width B between lower pivots is about B = 2·L·cos(θ), so the actuator that changes B directly controls H.
When you plan how to make a mini scissor lift, first fix the required collapsed and extended heights. Then back-calculate L and the minimum and maximum B using the relations above. A larger L gives more stroke for the same angle range but also raises buckling risk and footprint. DIY builders should sketch these relations or use a simple spreadsheet before cutting any steel.
| Design variable | Effect on lift |
|---|---|
| Link length L | Higher stroke but higher compression forces |
| Min. base width Bmin | Sets max height and peak internal forces |
| Max. base width Bmax | Sets collapsed height and footprint |
| Link angle range | Affects smoothness of motion and torque curve |
Actuator Placement, Screw Layout, And Torque Demand
Most DIY mini lifts use a screw jack or small hydraulic cylinder placed between the lower pivots. The closer the actuator works to the fully collapsed position, the higher the mechanical advantage and the higher the internal forces. Near minimum B, a small change in base width creates a large change in height, so the screw force and torque rise quickly.
To size the screw, you first estimate the horizontal force Fh needed between the lower pivots from a free-body diagram. This force depends on platform load, link angle, and friction. Screw torque T then follows from T ≈ Fh·(p/2π) adjusted for thread friction, where p is screw pitch. A fine pitch reduces handle force but makes lifting slower. Placing screw supports closer to the pivots reduces bending in the screw and keeps the load mainly axial.
When deciding how to make a mini scissor lift easier to crank, avoid actuator layouts that work at extreme link angles. Aim for a mid-stroke region where torque stays within comfortable hand force. CAD or simple 2D sketches help check that the screw never goes into a locked or over-center position.
Buckling, Deflection, And Frame Rigidity Checks
Slender scissor links carry mainly axial compression and tension. If links are too thin, they can buckle before reaching the rated load. DIY builders should treat each link as a column and check that its slenderness ratio and section modulus are adequate for expected forces. Short, deep sections resist buckling better than long, flat bars of the same mass.
Platform deflection also affects how solid the lift feels. Excess flex in the deck, pivots, or base frame creates wobble even when the structure is safe on paper. Simple checks include:
- Use closed sections or angle pairs for links instead of single flat bars.
- Add cross-bracing in the base and platform frames.
- Keep pivot clearances tight but free-moving with bushings or sleeves.
When you plan how to make a mini scissor lift, allow for both elastic deflection and wear over time. Oversize the main members by a sensible margin and keep welds away from high-stress pivot zones when possible.
Stability On Slopes, Wind, And Uneven Foundations
Even small lifts can tip if the base is narrow or the ground is uneven. Stability depends on the position of the combined center of gravity relative to the support polygon formed by the wheels or feet. As the platform rises, the center of gravity moves up and sometimes sideways, shrinking the stability margin.
Commercial mini lifts often limit work to slopes around 2° and specify outdoor wind limits. DIY designs should be at least as conservative. Practical measures include:
- Use a base width that keeps the vertical projection of the center of gravity well inside the footprint at full height.
- Add outriggers or screw jacks for use on rough floors.
- Restrict use to firm, level concrete and avoid holes or soft backfill.
Wind and side loads from people leaning or handling tools act like horizontal forces at platform height. These create overturning moments that grow with height. Anyone learning how to make a mini scissor lift should define a clear maximum working height and load for indoor and outdoor use and label the frame accordingly. Conservative limits and clear instructions are as important as the geometry itself.
Safe Design Limits For DIY Mini Scissor Lifts
DIY builders who search how to make a mini scissor lift must treat design limits as hard boundaries, not suggestions. Safe limits start with realistic load ratings, conservative safety factors, and clear duty cycles. Material strength, fatigue life, and joint details then lock those limits into the structure. Guardrails, interlocks, and OSHA-style features turn a working mechanism into a safe access system. Final validation comes from testing, inspection, and a simple maintenance plan that fits home or small-shop conditions.
Defining Load Ratings, Safety Factors, And Duty Cycles
Define the load rating first, then size every part around it. For a DIY mini scissor lift, keep rated loads modest, for example in the 100–250 kilogram range, well below industrial platforms that reached several tonnes. Use static safety factors of at least 2 for structure and 2.5–3 for pins, screws, and welds because fabrication quality is less controlled than in factories.
When you work out how to make a mini scissor lift, calculate forces at three positions: near fully collapsed, mid stroke, and near maximum height. Use free-body diagrams and the relations from scissor lift force studies to find link forces and actuator loads. Define duty cycle in simple terms: number of full lifts per hour and typical on-time per lift. For small electric or screw drives, a light duty cycle, for example a few lifts per hour with cool-down pauses, helps avoid motor overheating and screw wear.
Material Selection, Fatigue, And Joint Design
Choose common structural steels for links and base because they offer predictable strength and weldability. Thin aluminum sections can reduce weight but need larger profiles and better control of buckling. For DIY builds, rectangular hollow sections or flat bars with generous thickness give more margin against misalignment and local bending.
Fatigue matters even for small lifts if you cycle them often. Avoid sharp corners, sudden thickness changes, and undercut welds at high-stress regions near pivots and actuator brackets. Use through-bolted joints with washers and snug-fit holes for pivots instead of sloppy clearances that cause impact and fretting. Greaseable bushings or sleeves at pivot points extend life and keep clearances tight, which also improves stability at full height.
Guardrails, Interlocks, And OSHA-Compliant Features
Even a low mini lift can cause serious falls or crush injuries, so platform safety matters. Use fixed or folding guardrails on platforms where a person might stand, following OSHA scissor lift rules that required guardrails rather than relying on personal fall arrest. Typical top-rail heights around 1.0–1.1 metres and mid-rails near halfway provide basic fall protection.
Integrate simple interlocks where possible. Examples include a limit switch that stops upward travel before links reach a near-vertical, unstable angle, and an interlock that prevents drive motion if stabilizing outriggers or brakes are not engaged. Provide an emergency stop that cuts power to the actuator and a manual lowering method, such as a mechanical release or backup screw drive, for power loss situations. Clearly mark maximum load, allowed occupants, and no-go zones near pinch points on the frame.
Testing, Inspection, And Predictive Maintenance Basics
Before regular use, test the DIY mini scissor lift in stages. First run no-load cycles to check for binding, uneven motion, or abnormal noise. Then apply test loads up to the rated value while watching for excessive deflection, permanent deformation, or foundation movement. Keep the platform height modest during early tests so any failure has limited energy.
Routine inspection should focus on welds, bolts, pins, and the actuator. Look for cracks, paint flaking along weld toes, elongated holes, and oil leaks or screw wear. Simple predictive maintenance ideas work even in a home shop: log the number of cycles, re-grease pivots after a set number, and replace pins or bushings when play exceeds a small limit that you can feel by hand. Re-test at full rated load after any structural repair or modification, and never increase the rated load based only on “it seems fine” impressions.
Summary And Practical Design Takeaways
Anyone asking how to make a mini scissor lift must combine sound geometry, realistic loads, and proven safety rules. A compact layout with symmetric links and a low centre of gravity gives stable motion from minimum to maximum height. Designers should link platform size, stroke, and base footprint to the target job, such as bench work, service access, or small vehicle lifting.
Safe design starts from the load rating, not the mechanism. Define the maximum working load, add a safety factor, and then size links, pins, and actuators. Use simple force paths with short distances between pivots and actuators to limit bending and buckling. Check deflection and buckling at mid stroke and near full extension, where compressive forces peak and stability margins drop.
DIY builders should keep lift heights modest and platforms small to reduce overturning risk. Guardrails, toe boards, and interlocks should follow OSHA fall‑protection rules whenever people stand on the platform. For small work-positioning lifts that only carry tools or parts, physical stops, overload protection, and emergency lowering devices remain essential. Foundations or mounting frames must sit on level, strong concrete with verified thickness and reinforcement.
Future mini scissor lifts will use lighter alloys, compact electric drives, and better battery systems. However, the core principles stay the same. Stable geometry, clear load paths, conservative safety factors, and regular inspection matter more than special features. A careful, step‑by‑step design and test process turns a basic concept into a reliable mini scissor lift.
,
Frequently Asked Questions
What can I use instead of a scissor lift?
A dumbwaiter is an alternative option for lifting small loads, though it is typically used in vertical applications like food transport in restaurants. For heavier or more versatile lifting, consider using a boom lift or a small forklift depending on the task requirements. Elevator Types Overview.
How to make a simple scissor lift?
To create a basic scissor lift, you will need high-strength materials like steel and tools such as an angle grinder. Follow these steps:
- Design the structure with a scissor mechanism.
- Cut and bend the metal pieces to form the arms.
- Drill holes for pivot points and assemble the arms using bolts.
- Add a hydraulic or mechanical actuator to enable lifting. DIY Scissors Guide.
How much does a mini scissor lift weigh?
The weight of a mini scissor lift varies based on its design and capacity. Typically, compact models weigh between 200 kg to 500 kg. Factors influencing weight include platform size, lifting height, and material durability. Always check the manufacturer’s specifications for precise details.
How to transport a small scissor lift?
To transport a small scissor lift, follow these steps:
- Inspect both the lift and the trailer for safety.
- Clear the loading area and position the trailer securely.
- Drive the lift onto the trailer using reinforced ramps.
- Secure the lift with straps and ensure proper balance during transit. Trailer Loading Tips.