Safe handling of chemical drums means combining the right engineered equipment with disciplined spill‑prevention procedures from SDS review to final storage. This guide explains how to move drum stacker of chemicals safely, choose suitable handling and pumping gear, and design containment that actually works in the field.
You will see how hazard classification, route planning, material compatibility, and static control drive equipment selection, and how inspection, stacking, venting, and emergency response routines prevent small issues from becoming major incidents.
Risk Assessment And Regulatory Framework For Drum Handling
Risk assessment and regulatory alignment are the foundation of how to move drums of chemicals without spills, injuries, or violations. You classify contents, verify labels, select PPE, and match handling methods to OSHA, EPA, DOT, and ATEX rules.
| Risk Area | Key Questions | Main Controls | Operational Impact |
|---|---|---|---|
| Chemical hazards | What is inside the drum and how dangerous is it? | SDS review, hazard classification | Determines equipment materials, zoning, and PPE level. |
| Labeling and ID | Is the drum correctly and clearly identified? | Label checks, re-labeling, documentation | Prevents mix-ups and incompatible contact during moves. |
| Mechanical risk | How heavy and stable is the drum during handling? | Load calculations, equipment selection | Reduces tip-over, drop, and crush incidents. |
| Regulatory duties | Which rules apply to this drum and task? | OSHA, EPA, DOT, ATEX compliance | Avoids fines and enforces minimum safety baselines. |
💡 Field Engineer’s Note: Treat every “mystery” or poorly labeled drum as worst-case hazardous until SDS and monitoring prove otherwise; this single rule has prevented many near-misses during emergency cleanups.
Classifying contents and reviewing SDS data
Classifying drum contents and reviewing SDS data tells you exactly how to move drums of chemicals, what equipment is compatible, and what can go wrong if containment fails.
- Identify contents first: Every unmarked or unclear drum is hazardous by default – this stops you from pairing the wrong handling method with an unknown risk.
- Use the SDS as the design basis: Check physical, health, and environmental hazard sections – they define what a “safe move” looks like for that product.
- Focus on key physical properties: Vapor pressure, flash point, viscosity, and density – these drive pump choice, venting needs, and spill behavior.
- Map hazards to zones: Flammable, oxidizing, corrosive, toxic, environmentally hazardous – this supports zoning (EX areas), segregation, and emergency planning.
- Confirm incompatibilities: Check SDS reactivity and storage incompatibilities – prevents placing drums together that can react if both leak.
| SDS Parameter | What It Tells You | Impact On Handling Equipment | Operational Impact |
|---|---|---|---|
| Flash point | Temperature at which vapors ignite | Triggers EX-rated gear and bonding/grounding | Defines if area is potentially explosive during transfer. |
| Vapor pressure | How fast vapors evolve | Affects need for venting and ventilation | High values mean more aggressive fume control. |
| Viscosity | How thick the liquid is | Determines pump type and flow limits | Viscous products require slower, higher-torque transfer. |
| Density / specific gravity | Mass per volume of contents | Determines worst-case drum weight | Ensures lifters and trucks are sized with margin. |
| Corrosivity | Attack on metals and tissues | Drives material choice (PP, PVDF, PTFE, stainless) | Prevents premature failure and leaks in wetted parts. |
| Toxicity / carcinogenicity | Health impact of exposure | Defines PPE level and containment stringency | Higher toxicity demands tighter control of splashes and vapors. |
How to structure a quick SDS review before moving drums
Step 1: Read Sections 1–3 (identification, hazards, composition) – confirms what you are actually moving.
Step 2: Read Sections 7–8 (handling, storage, exposure controls/PPE) – translates directly into operator instructions.
Step 3: Read Sections 9–10 (physical data, stability/reactivity) – guides equipment materials and segregation.
Step 4: Read Sections 5–6 (firefighting, accidental release) – informs spill kit choice and emergency plans along the route.
- Estimate drum mass: Multiply liquid density from SDS by drum volume and add drum tare – this ensures the lifter capacity is comfortably above the heaviest credible case.
- Link SDS to routes: For each transfer path, check if the SDS suggests special ventilation, temperature limits, or shock avoidance – you then avoid routing sensitive chemicals through hot or congested areas.
Label integrity, PPE, and operator training
Label integrity, PPE, and operator training turn risk assessment into day-to-day control, ensuring every person knows how to move drums of chemicals safely and legally.
- Maintain label integrity: Product name, hazard pictograms, signal word, and emergency contact must be readable – this keeps front-line staff aligned with the SDS and procedures.
- Re-label before moving: Any missing, damaged, or illegible label is fixed before the drum leaves its spot – you remove the “mystery drum” scenario mid-route.
- Add handling instructions: Notes like “ground before pumping” or “do not roll on chime” go directly on the drum – operators see critical rules at the point of action.
- Standardize label format: Use consistent layouts across storage and shipping – this speeds up checks and reduces training complexity.
| Label Element | Purpose | Typical Content | Operational Impact |
|---|---|---|---|
| Product identifier | Exact chemical identity | Name, code, batch | Links drum to correct SDS and procedures. |
| Hazard pictograms | Visual risk summary | Flame, skull, corrosion, etc. | Instant cue for PPE and segregation. |
| Signal word | Severity level | “Danger” or “Warning” | Helps prioritize risk during multi-drum moves. |
| Precautionary statements | Key do’s and don’ts | “Keep away from heat” etc. | Informs routing and storage decisions. |
| Emergency contact | Rapid escalation | Phone, internal code | Saves time in spill or exposure events. |
- Match PPE to task, not just chemical: Combine SDS recommendations with specific handling steps – pouring, pumping, or overpacking often needs more protection than closed storage.
- Core PPE elements: Safety footwear, chemical-resistant gloves, eye protection, and sometimes face shields or aprons – these mitigate the most common splash and crush injuries during drum moves.
- Escalate PPE for high hazard: For highly corrosive, toxic, or unknown contents, add respiratory protection and full-body chemical suits – this buys time if containment fails.
| Task Type | Typical Drum Condition | Recommended PPE Level | Operational Impact |
|---|---|---|---|
| Visual inspection only | Closed, sound, correctly labeled | Safety shoes, eye protection | Allows quick walk-through checks with minimal encumbrance. |
| Standard movement on truck or lifter | Closed, sound, known contents | Shoes, gloves, eye protection; add apron for corrosives | Balances safety and mobility for routine transfers. |
| Handling leaking/damaged drums | Visible seepage or bulging | Full chemical PPE, possibly respirator | Slows work but protects during high-risk interventions. |
| Unknown or suspect drums | No label, crystallization, strange odors | Highest PPE, specialist team | Shifts work to trained hazardous waste responders. |
- Train on hazards, not just equipment: Operators learn what pictograms mean, how to read key SDS sections, and what incompatibilities look like – this lets them spot problems early along the route.
- Drum-handling technique training: Emphasize no manual lifting of full 200 L drums and correct use of trucks, lifters, and clamps – this reduces musculoskeletal and crush injuries.
- Regulatory training integration: Align courses with OSHA hazard communication and, where relevant, DOT hazmat training modules – this keeps your competence matrix aligned with legal expectations.
- Emergency and spill drills: Practice “stop, secure, report” sequences and area isolation – so the team reacts consistently the first time a drum leaks mid-transfer.
💡 Field Engineer’s Note: When I audit sites, the best predictor of safe drum handling is not the newest equipment, but whether operators can explain the label and SDS in their own words; if they cannot, your risk assessment is still stuck on paper.
Engineering Selection Of Drum Handling And Transfer Equipment
Engineering selection of drum handling and transfer equipment means matching mechanical capacity, stability, and material compatibility to the worst credible drum, route, and chemical so you prevent spills while moving drums of chemicals efficiently and safely.
This section turns “how to move drums of chemicals” into a structured engineering exercise: define load cases and routes, then choose movers, lifters, and pumps that respect stability limits, chemical compatibility, and static-control requirements.
Defining load cases, routes, and stability limits
Defining load cases, routes, and stability limits means you first quantify the heaviest, most awkward drum move and the path it follows, then choose equipment that stays stable with margin in those conditions.
Before you look at catalogues, you need hard numbers on drum weights, dimensions, and travel paths so you do not under-specify capacity or overestimate stability.
| Design Factor | Typical Engineering Range / Consideration | Operational Impact |
|---|---|---|
| Drum volume and type | 200 L steel/plastic; approx. 580–600 mm diameter, 880–900 mm height | Determines clamp geometry, CG height, and minimum aisle width for turns. |
| Filled mass (worst case) | Approx. 180–360 kg for typical 200 L drums; corrosives and dense acids can exceed 390 kg | Sets minimum safe working load (SWL); drives frame, wheel, and attachment sizing. |
| Dynamic load factor | 1.1–1.3 × static weight for starts/stops and small impacts | Ensures the handler tolerates braking, bumps, and minor drops without structural failure. |
| Route gradients | Preferably ≤2% for manual handlers; steeper slopes require powered equipment and braking | Prevents runaway loads and loss of control on ramps or dock plates. |
| Aisle width and turning radius | Common aisles 1.8–2.5 m; handlers often need ~1.5 m turning circle | Confirms if a wheeled transporter or forklift attachment can turn without striking racks. |
| Floor condition | Dry, level, free of oil; no significant cracks or steps >10–15 mm | Reduces tipping risk and sudden shocks into the drum and frame. |
| Duty cycle | From a few moves/day to continuous shifts | Low duty can use manual hydraulic units; high duty favors powered or custom handlers. |
- Define worst-case drum mass: Use density and fill level – prevents undersized lifters when product changes.
- Map every route: Include doors, ramps, thresholds – avoids discovering “impossible corners” during live operations.
- Classify atmospheres: Note flammable zones – drives use of non-sparking and ATEX-style equipment.
- Set stability limits: Define max slope, speed, and stack height – gives clear rules for operators and planners.
- Plan maintenance access: Consider where inspections and repairs occur – keeps critical drum movers available and compliant.
How to estimate drum weight from SDS data
Take the drum’s nominal volume (e.g., 200 L), multiply by product density from the SDS (kg/L), then add the empty drum weight (typically 8–20 kg). Use the highest plausible density if the product range varies.
💡 Field Engineer’s Note: When I survey routes, any ramp steeper than about 2% with smooth paint is a red flag for manual drum trucks. On wet or dusty floors, even a “small” slope turns a 300 kg drum into an unmanageable runaway, so I either flatten the route or switch to powered units with brakes.
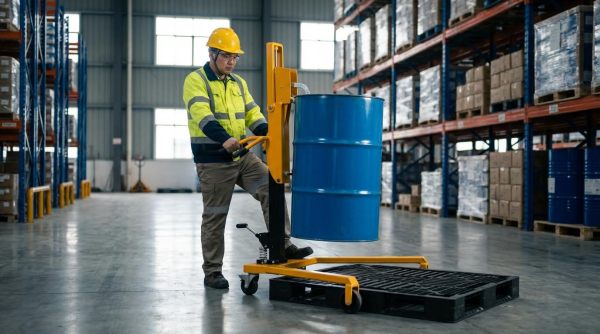
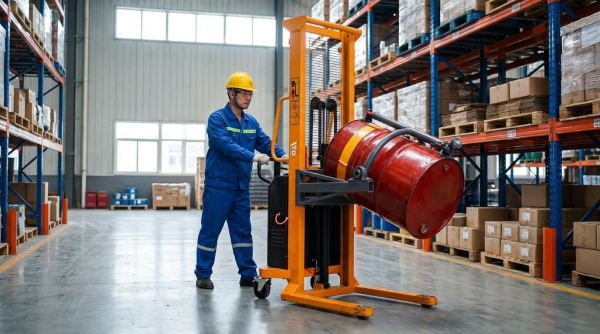
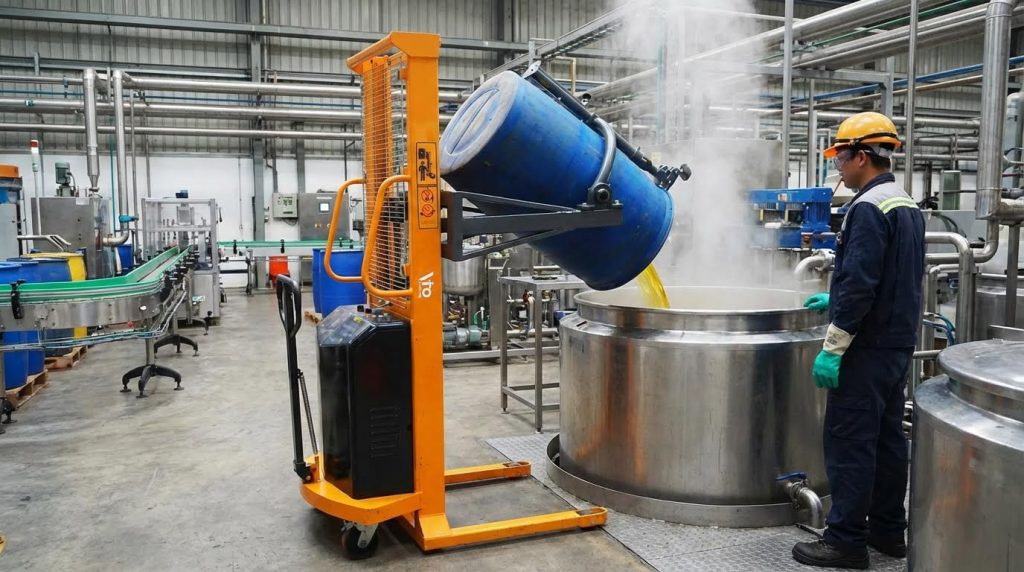
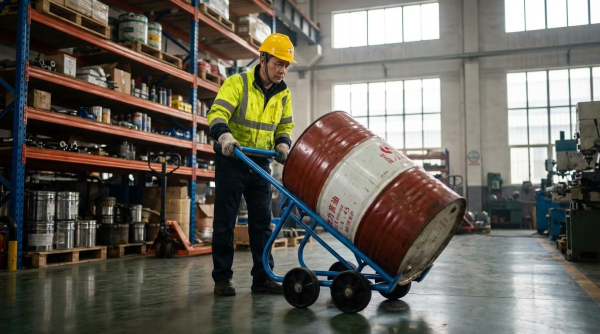
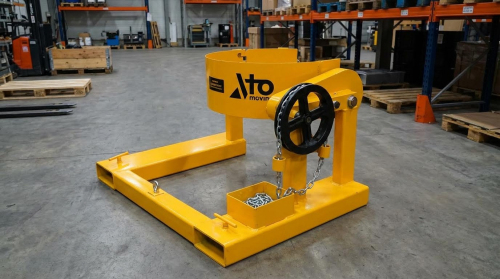
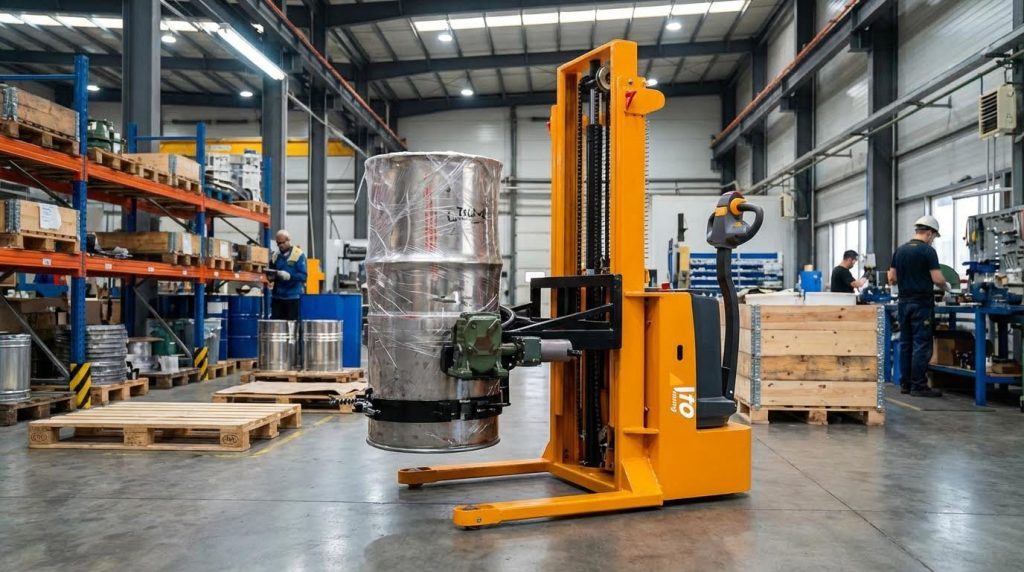
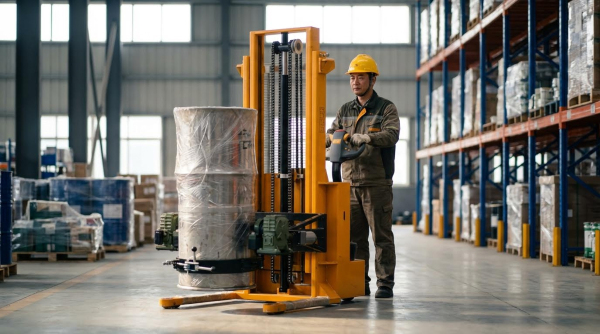
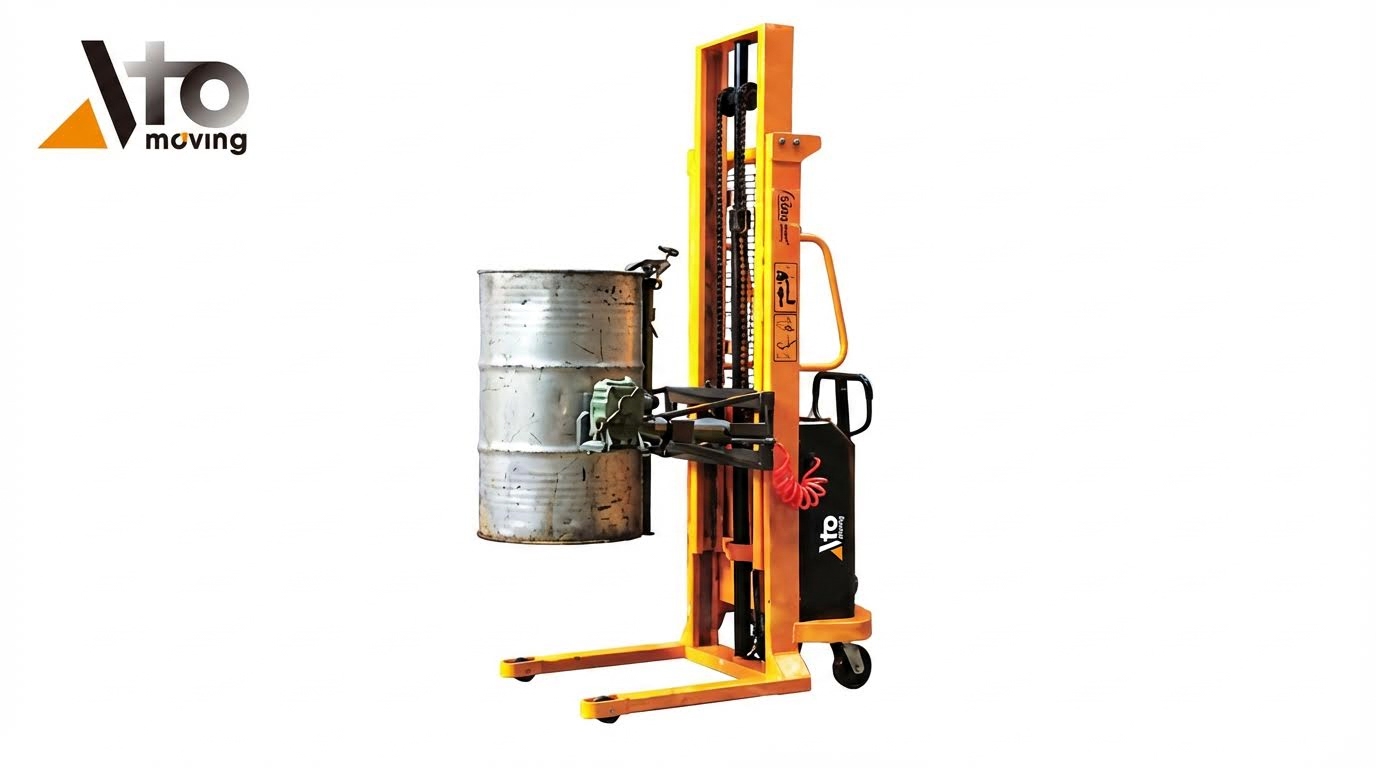
Choosing drum movers, lifters, and attachments
Choosing drum movers, lifters, and attachments means selecting specific manual, powered, or overhead devices that match your load cases and tasks while keeping the drum’s center of gravity inside a stable footprint.
This is where you translate “how to move drums of chemicals” into concrete equipment choices that reduce push forces, avoid manual upending, and keep operators away from pinch points.
| Equipment Type | Typical Capacity / Geometry | Best For… |
|---|---|---|
| Drum hand truck / trolley | Up to ~300 kg; two-wheel tilt-back design | Short moves of single drums on flat floors; low-frequency tasks where space is tight. |
| Mobile drum lifter / transporter | Approx. 360–450 kg SWL; frame ~1.2–1.3 m long × 0.9 m wide | Ground-level pickup, moving drums onto pallets or spill decks within a warehouse. |
| Forklift drum attachment (beak, clamp, or grab) | Commonly 450 kg or more per drum, depending on forklift rating | Multiple-drum moves over longer distances; loading trucks and stacking in rows. |
| Overhead drum lifter (below-the-hook) | Approx. 450–900 kg, depending on grab style | Vertical lifting into overpacks, pits, or process vessels where floor access is blocked. |
| Drum racker | Typically 360–450 kg; rotates drum from vertical to horizontal | Placing drums on racking or stands, avoiding manual upending and high stacking. |
| Drum pourer / karrier | Similar to racker; rotational control around drum axis | Controlled decanting into smaller containers or reactors without splashing. |
| Powered walk-behind drum handler | Electric lift/tilt; often 450 kg+ capacity | High-throughput lines, long routes, or where manual pumping and pushing cause fatigue. |
| Excavator or loader-mounted grappler | Variable; sized for 200 L drums with strong clamping | Hazardous-waste fields or unstable drums where distance from the operator is critical. |
- Select by task, not catalog picture: Define if you are storing, loading trucks, or feeding a process – each task favors different attachments.
- Oversize capacity: Aim for at least one size above your heaviest drum – absorbs density changes and sludge build-up.
- Match clamp to drum type: Beak heads need intact chimes; band or fully enclosed clamps tolerate dented or fiber drums – reduces drop risk.
- Keep CG low: Choose handlers that carry drums as close to floor level as possible – improves stability on uneven floors.
- Respect truck ratings: Forklift drum attachments must sit within the rated load center – prevents tipping the truck during tilt or braking.
When to move from manual to powered drum handling
Shift to powered handlers when operators move more than a few dozen drums per shift, routes include ramps or thresholds, or drums regularly exceed ~250–300 kg. At that point, push forces, strain risk, and stopping distances justify powered travel and lift.
💡 Field Engineer’s Note: I treat a 200 L drum as a “live load” like a suspended person: if the chime is badly deformed or the label says shock-sensitive, I avoid beak-style attachments and use a fully enclosed clamp or cradle. That way, if the shell fails, the handler still contains the drum.
Pump, material, and static-control specification
Pump, material, and static-control specification means choosing transfer pumps and wetted materials that resist the chemical, then adding bonding and grounding so you avoid ignition and leaks during dispensing.
This is the final piece of how to move drums of chemicals safely: once the drum is in position, you must transfer the liquid without attacking the pump or building dangerous static charges.
| Selection Aspect | Typical Options / Ranges | Operational Impact |
|---|---|---|
| Pump drive type | Manual (rotary/piston), electric, or pneumatic | Manual suits low-viscosity, low-volume work; pneumatic favors flammable zones; electric suits continuous duty with good power supply. |
| Viscosity range | Thin solvents to highly viscous oils or syrups | Higher viscosity pushes you toward positive displacement pumps and larger motors or air drives. |
| Wetted materials | PP, PVDF, PTFE, stainless steel, plus seals in PTFE, FKM, EPDM | Correct pairing avoids swelling, cracking, or stress corrosion that can lead to sudden leaks. |
| Flow rate | Roughly 10–100 L/min for typical drum transfer | Higher flow shortens transfer time but increases static and splash risks if not controlled. |
| Static control | Bonding cables, grounding clamps, conductive hoses | Prevents charge build-up and sparks when handling flammable or combustible liquids. |
- Start from the SDS: Use viscosity, flash point, and corrosivity to narrow pump and material choices – avoids trial-and-error failures.
- Match pump to duty cycle: Intermittent sampling can use manual pumps; continuous transfer needs electric or air-driven units – prevents overheating and premature wear.
- Specify chemical-resistant wetted parts: Combine PP/PVDF/PTFE or stainless with compatible seals – prevents stress cracking and seal blowouts.
- Build in static control: Bond drum, pump, and receiving vessel; ground at least one point – critical for low-conductivity, flammable liquids.
- Consider energy efficiency: Use variable-speed drives or regulators – cuts power or air consumption and reduces heat input into the product.
Quick compatibility rule-of-thumb
Use PP or PVDF for many acids and alkalis, PTFE for broad but lower-strength resistance, and stainless steel for many solvents and fuels that do not cause chloride stress corrosion. Always verify against a chemical resistance chart and the SDS before final selection.
💡 Field Engineer’s Note: In flammable liquid transfer, I always specify conductive hoses and a fixed grounding point near the drum station. Plastic hoses on non-conductive drum pallets can quietly build thousands of volts of static; the first metal contact at the receiving tank can be the ignition source you never see coming.
Spill-Prevention Procedures And Containment Design
Spill-prevention for chemical drums means catching problems early, controlling drum movement, and sizing containment so even worst-case leaks stay inside engineered barriers. It is the practical backbone of how to move drums of chemicals safely.
This section converts regulations and SDS data into field-ready routines: what to inspect before moving, how to secure and stack drums, and how to vent, overpack, and respond when something still goes wrong.
Pre-use inspection and leak detection routines
Pre-use inspection and leak detection stop most drum spills before they start by rejecting damaged containers and unsafe routes. You build a repeatable checklist that operators can complete in under a few minutes per batch.
- Verify identity and hazards: Confirm labels, hazard pictograms, and product name match the work order – Prevents moving unknown or incompatible chemicals.
- Review SDS highlights: Note corrosivity, flammability, vapor pressure, and reactivity – Drives PPE, ventilation, and equipment selection.
- Check closures: Inspect bungs, lids, and gaskets for tightness, corrosion, or seepage – Reduces leaks when the drum is tilted or vibrated in transit.
- Inspect shell and chimes: Look for dents, deformed chimes, corrosion, bulging, or impact damage – Flags drums that may fail under stacking or lifting loads.
- Scan the floor and surroundings: Look for stains, crystallization, dead vegetation, or strong odors – Early indicators of slow leaks or vapor issues.
- Estimate mass: Cross-check density and fill level from SDS with typical 200 L drum weights (≈180–360 kg) – Prevents overloading handlers and attachments.
- Assess atmosphere for high-risk areas: Use gas detectors or oxygen monitors around suspect or unknown drums – Protects against toxic, flammable, or oxygen-deficient atmospheres.
- Tag and segregate rejects: Any drum with leaks, missing labels, or severe corrosion gets “Do Not Move” status – Forces controlled remediation instead of ad‑hoc handling.
Typical pre-use inspection sequence for a pallet of drums
Walk the route first, then inspect the pallet from a safe distance, checking for bulging or staining. Move closer to check labels and closures. Only then bring in the drum truck or lifter. This order minimizes exposure if one drum is leaking or over-pressurized.
💡 Field Engineer’s Note: Build your inspection into the job start, not as an optional step. In practice, most drum failures I have seen happened on marginal containers that “looked okay from a distance” but had weeping bungs or thin, pitted bottoms that a 30-second close check would have caught.
Load securing, stacking, and secondary containment
Load securing, stacking, and secondary containment keep spills localized even when a drum shifts, tips, or fails, turning a potential plant shutdown into a manageable clean-up inside a controlled footprint.
When you plan how to move drums of chemicals, you must design both restraint (to stop movement) and volume capture (to catch whatever escapes if restraint fails).
| Design Element | Typical Engineering Guideline | Operational Impact |
|---|---|---|
| Drum orientation in storage | Store upright with closures accessible and markings outward | Speeds identification and leak checks; minimizes closure stress |
| Pallet stacking height | Usually ≤2 drum layers unless racking is engineered for more | Improves stability and reduces crush load on lower drums |
| Strapping / restraint | Use rated straps, chocks, or clamps sized to drum mass (≈180–360 kg) | Prevents rolling or tipping during forklift braking and cornering |
| Segregation of incompatibles | Separate acids, bases, oxidizers, and organics per SDS incompatibilities | Limits reaction severity if multiple drums fail simultaneously |
| Secondary containment volume | At least the larger of 110% of largest drum or 10% of total stored volume | Captures full loss from a single drum plus typical splash and drainage |
| Containment pallet height | Commonly 150–300 mm sump depth | Allows forklift access while providing enough headroom for leaks |
| Inspection frequency | Daily visual plus formal weekly checks of stacks and sumps | Detects weeping or corrosion before structural failure |
- On-vehicle securing: Use tensioned straps and drum wedges on trucks and forklifts – Prevents drums from shifting into mast or falling during sharp turns.
- Flatbed and dock loading: Combine wheel chocks, blocking, and containment pallets – Controls both movement and potential leakage on transport vehicles.
- Segregated zones: Mark and physically separate oxidizers, flammables, and corrosives – Reduces escalation if a fire or leak spreads across a bay.
- Floor compatibility: Ensure containment pallets and sumps resist stored chemicals – Prevents the containment itself from failing under attack.
- Drain and sump management: Keep sump outlets valved and normally closed – Avoids “phantom containment” where captured liquids drain to the sewer.
How to size a small drum containment area
For a bay with four 200 L drums (total 800 L), regulations often require the larger of 110% of the largest drum (220 L) or 10% of total volume (80 L). Here, 220 L governs, so you design the sump for ≥220 L useful capacity.
💡 Field Engineer’s Note: The most common failure I see is beautiful bunds with no thought given to forklift forks and turning radii. If the containment lip is too high or too close to rack uprights, operators “cheat” and start staging drums outside the protected zone. Always model the actual truck geometry and turning path when you lay out containment.
Venting, overpacking, and emergency spill response
Venting, overpacking, and emergency spill response are your last line of defense when pressure build-up, drum damage, or operator error defeat the first layers of protection.
These procedures decide whether a problem stays as a contained incident or escalates into a plant-level emergency.
- Venting for pressure control: Use pressure-vacuum vents in bung openings for volatile or temperature-sensitive products – Prevents drum deformation and rupture during storage or high flow transfer.
- Vent sizing and compatibility: Match vent capacity to pump flow rate and liquid viscosity; choose materials compatible with the chemical – Avoids vacuum collapse and sticking vents that fail when needed.
- Safe vapor routing: For flammables, route vents to safe locations with adequate ventilation – Reduces explosion risk around filling and decanting points.
- Overpack decision criteria: Overpack drums that show active leaks, severe corrosion, or impact damage – Provides an immediate secondary barrier before moving the drum.
- Overpacking methods: Either slide the damaged drum into an overpack or lower the overpack over the drum – Choice depends on access, drum stability, and surrounding congestion.
- Spill kit positioning: Stage absorbents, drain covers, and overpacks at storage, transfer, and loading areas – Shortens response time when a leak occurs.
- Response sequence: Train “control, contain, clean up” as the default order – Keeps focus on stopping the source before chasing the liquid.
- Escalation triggers: Define when to evacuate, call external responders, or activate fire systems – Removes hesitation in high-stress events.
Basic overpacking workflow for a leaking drum
1) Stop all non-essential work and isolate the area. 2) Don PPE per SDS. 3) Place absorbent around the drum to control spread. 4) Position the overpack drum close, on level ground. 5) Either tilt and slide the leaking drum into the overpack or lower the overpack over it using a lifter. 6) Secure the overpack lid and label it clearly for later handling.
💡 Field Engineer’s Note: In real incidents, the biggest time loss is people searching for the right overpack or absorbent. Treat spill kits and overpacks like fire extinguishers: fixed, signed locations, monthly checks, and simple “open and use” layouts so even a stressed operator can act in seconds.

Final Thoughts On Designing A Safe Drum Handling System
A safe drum handling system links risk assessment, engineered equipment, and disciplined procedures into one closed loop. You start by treating SDS data and labeling as hard design inputs, not paperwork. This defines worst-case drum weight, chemical attack, and explosive atmosphere so you can size lifters, choose compatible pumps, and specify static control correctly.
Engineering then turns these inputs into stable moves. You keep the center of gravity low, oversize capacity, and match each route to suitable movers, clamps, and containment. This prevents tip-over, runaway loads, and structural failures that turn minor leaks into major events.
Spill-prevention routines close the gap between design and daily work. Pre-use inspections, secure stacking, right-sized bunds, and clear venting and overpacking rules ensure that when a drum degrades or a seal fails, the liquid still stays inside planned barriers.
The best practice is simple: design from the worst credible drum and route, verify every move against SDS and labels, and train operators until these checks are habit. Use Atomoving or similar engineered handlers as part of this system, not a substitute for it. When equipment, procedures, and training align, safe drum handling becomes repeatable, auditable, and resilient to change.
Frequently Asked Questions
What is the best way to move drums of chemicals?
Moving drums of chemicals requires proper equipment and safety precautions. Use a drum truck, forklift attachment, or below-hook drum lifter specifically designed for drum handling. Moving drums with a bare fork on your forklift is not recommended, as the drum can slip or get damaged. Drum Handling Safety Tips.
What do you need to transport chemicals safely?
Secondary containment on carts or bottle carriers is required when moving chemicals outside of the manufacturer’s packaging. Use carts for quantities exceeding 1 gallon, and ensure incompatible materials are not transported on the same cart. Always follow safety guidelines to prevent spills or accidents. Hazardous Materials Transport Guide.
How to move drums safely by hand?
To move drums by hand, start by positioning yourself low and close to the drum. Push forward slowly with your legs until the drum reaches its balance point. If using the drag/pull method, place your hands shoulder-width apart, brace the drum with your foot, and shift your weight to the rear foot. Safe Drum Moving Techniques.