Safe handling procedures for 55-gallon drums in warehouses and plants start with one rule: never treat a 180–360 kg drum as “just another package.” If you want to know how to safely handle a 55 gallon drum, you must combine correct equipment, compliant storage, and disciplined procedures. This guide explains the real hazards, the regulations that apply, and the engineering controls that keep drums upright, contained, and under control from receiving to shipment.
Core Hazards, Regulations, And Risk Controls
This section explains how to safely handle a 55 gallon drum by understanding its hazards, the regulatory framework, and the risk controls that must be built into every move, route, and task. It links physics, law, and practical procedures so supervisors can write enforceable, defensible drum-handling rules.
Drum mass, stability, and tipping risks
Drum mass, center of gravity, and support geometry define how to safely handle a 55 gallon drum without tipping or crushing injuries. A full 55-gallon (200 L) drum is not “just another load”; it behaves like a tall, unstable column once you start it moving.
| Parameter | Typical Range / Condition | Risk Mechanism | Operational Impact |
|---|---|---|---|
| Full drum mass | 180–360 kg | Exceeds safe manual lift limits; high kinetic energy if it rolls or falls. | Manual lifting is prohibited; only engineered handling devices are acceptable. |
| Geometry | Diameter ≈ 580–610 mm, height ≈ 880–900 mm | Slender, tall load with small footprint relative to height. | Very sensitive to side impacts, potholes, and sudden steering inputs. |
| Center of gravity | Above mid-height when upright | Low tipping moment needed to start a fall. | Requires low pickup points, wide wheelbase, and positive retention. |
| Rolling behavior | High inertia cylinder | Hard to stop once rolling; crush risk to feet and hands. | Strict no “catching” rules; controlled routes and chocks needed. |
| Stacking | Commonly up to 2-high | Variable wall strength, dents, and pallet defects can trigger collapse. | Enforce conservative stack heights and pallet inspections. |
- No freehand lifts: Any full 55-gallon drum exceeds typical 20–25 kg manual handling limits – engineered devices replace muscle power.
- Low support points: Use dollies, trucks, or clamps that support the drum close to its base – this increases the tipping angle and stability.
- Wide wheelbase: Select equipment with wide, rigid frames – this resists side loads when turning or crossing thresholds.
- Positive retention: Straps, jaws, or rim-clamps must lock the drum – prevents bounce-out on dock plates or uneven floors.
- Speed control: Walking and driving speeds must be limited – abrupt braking with a 300 kg drum can exceed friction and cause sliding or tip-over.
How to estimate drum weight before moving
Use the fill level, product density from the Safety Data Sheet (SDS), and the drum tare mass. Multiply density (kg/L) by volume (L), then add the drum weight. If you cannot confirm weight, assume the upper range and size equipment accordingly.
💡 Field Engineer’s Note: On slightly sloped floors (1–2%), an “almost still” drum can start rolling if bumped. Always orient drums with chocks or wheel stops at low points, and never leave a drum on its side without physical restraint.
Regulatory framework: OSHA, EPA, DOT, NFPA

OSHA, EPA, DOT, and NFPA rules collectively define how to safely handle a 55 gallon drum by controlling worker exposure, environmental release, transport conditions, and fire and explosion risks. Your site procedure must stitch these requirements into one coherent system.
- OSHA (worker safety): Governs material handling, ergonomics, hazard communication, and flammable liquids – protects people doing the work.
- EPA (environmental protection): Sets spill containment, waste storage, and secondary containment sizing – prevents soil and water contamination.
- DOT (transport): Regulates packaging, labeling, and securement when drums move on public roads – keeps loads safe beyond your fence line.
- NFPA (fire and explosion): Defines flammable liquid classifications, storage, and ignition control – reduces fire severity and spread.
| Regulator | Key Focus for 55-gallon drums | Example Requirement | Operational Impact |
|---|---|---|---|
| OSHA | Worker safety, flammable liquids | Flammable liquids are categorized by flashpoint and boiling point into Categories 1–4. See OSHA flammable liquids guidance | Determines where and how drums of solvents, fuels, or alcohols can be stored and handled. |
| EPA | Spill prevention and containment | Secondary containment must hold at least 10% of total volume or 100% of the largest container, whichever is greater. | Dictates sump pallet sizes, bund volumes, and drainage layouts in drum storage areas. |
| DOT | Transport packaging and labeling | Requires correct UN-rated drums, hazard labels, and securement during road transport. | Impacts drum specification, load planning, and documentation for outbound shipments. |
| NFPA | Fire and explosion control | Uses flashpoint-based categories aligned with OSHA; controls ignition sources and storage separation distances. | Drives zoning of drum storage away from ignition sources and defines cabinet/room needs. |
Flammable liquid categories and why they matter
OSHA divides flammable liquids into four categories based on flashpoint and boiling point. Category 1 has the lowest flashpoints (most easily ignited), while Category 4 has higher flashpoints up to 93°C. Lower category numbers usually mean stricter storage, ventilation, and ignition control measures for the drums that contain them. OSHA flammable liquids document
- Label before move: Every drum must have legible labels and markings – operators must know if they are moving corrosive, flammable, or benign contents.
- Match equipment to classification: Use non-sparking tools and rated equipment in flammable zones – prevents ignition of vapors during handling.
- Integrate containment into layout: Bunds, sump pallets, and graded floors must be part of the storage design – one leaking drum should not become a facility-wide incident.
💡 Field Engineer’s Note: When you write “how to safely handle a 55 gallon drum” into a procedure, cross-reference the specific OSHA and EPA clauses that apply. This makes audits smoother and forces each step (inspection, move, storage) to have a clear regulatory owner.
Injury modes, risk assessment, and no-lift policies
Injury modes, structured risk assessment, and strict no-lift policies turn the physics and regulations into concrete rules for how to safely handle a 55 gallon drum on every shift. The goal is to eliminate manual lifting, control foreseeable failures, and prevent “hero moves.”
| Injury Mode | Typical Cause | Preventive Control | Operational Impact |
|---|---|---|---|
| Back sprains / hernias | Attempting to tilt, catch, or lift drums manually. | No-lift policy; mandatory use of drum trucks, dollies, or forklifts. | Procedures forbid hand-lifting; supervisors enforce equipment use. |
| Crushed toes / feet | Drum rolls over feet or drops from pallet or truck. | Safety footwear, clear “no feet under drum” rule, chocks on slopes. | Marked exclusion zones around moving and upending operations. |
| Finger / hand crush | Hands on chimes while rolling; caught between drums or drum and wall. | Keep hands on tools/handles only; use spacers for alignment. | Training emphasizes never using hands as “stops” or “wedges.” |
| Chemical exposure | Leaking or corroded drums, failed bungs, or impact damage. | Pre-move inspection, PPE matched to SDS, spill kits staged nearby. | Move is stopped if leaks or bulging are found; drums quarantined. |
| Stack collapse | Over-stacking, damaged drums, or poor pallets. | Stack height limits (often max 2-high), pallet inspection, securement. | Storage plans define where and how many drums can be stacked. |
- Formal risk assessment: Evaluate each task (filling, sampling, loading, storage) for mechanical and chemical hazards – this prevents “hidden” high-risk moves, like pushing drums across slopes.
- No-lift policy: Explicitly ban freehand lifting or catching of full drums – removes the option for workers to “be a hero” and get injured.
- Route inspection: Require pre-use checks of aisles, ramps, and dock plates – small defects can destabilize a tall, heavy drum.
- Stop-work authority: Give operators the right and duty to stop if a drum looks unsafe (bulging, corroded, mis-labeled) – prevents incidents triggered by “just moving it once.”
- Drills and scenarios: Practice responses to a falling drum, a small leak, and a major spill – trained muscle memory reduces panic and secondary injuries.
- Step 1: Identify task and contents – risk level changes completely between water-based product and Category 1 flammable liquid.
- Step 2: Inspect drum and path – detect damage, leaks, or obstructions before committing to the move.
- Step 3: Choose engineered aid – match dollies, trucks, or attachments to drum weight and route conditions.
- Step 4: Control the area – set exclusion zones so bystanders cannot enter the line of fire.
- Step 5: Execute at controlled speed – slow, deliberate moves give time to react if something behaves unexpectedly.
💡 Field Engineer’s Note: Many serious injuries happened when a drum started to fall and someone instinctively tried to “save the product.” Train repeatedly that a falling 300 kg drum is never to be caught or supported; step back, warn others, and let it go.
Engineering Controls And Equipment For Drum Handling
Engineering controls and purpose-built equipment are the backbone of how to safely handle a 55 gallon drum, because they remove manual lifting, control stability, and standardize safe travel paths.
💡 Field Engineer’s Note: Treat every 55-gallon (200 L) drum like a 180–360 kg suspended load: if you would not walk under a hanging pallet of that mass, you should not “man-handle” the drum without engineered support.
Pre-move inspection, identification, and route planning
Pre-move inspection and route planning ensure you never move an unknown or damaged 55-gallon drum into an unsafe path.
- Verify identity: Read labels and Safety Data Sheets (SDS) – confirms chemical hazards before choosing equipment and PPE.
- Confirm fill and density: Use SDS density and visible fill level – estimates drum mass (often 180–360 kg) to size equipment correctly.
- Inspect shell and chimes: Check for dents, corrosion, creased chimes – reduces risk of collapse when clamped or stacked.
- Check closures: Verify bungs, lids, rings are tight – prevents slosh, leaks, and pressure-driven spills during movement.
- Scan for bulging: Look for domed heads or “fat” sidewalls – flags internal pressure; such drums should not be moved until made safe.
- Plan the route: Walk the path, remove obstacles, confirm door widths and gradients – avoids last-second sharp turns that can tip a tall drum.
- Confirm floor condition: Check for wet spots, cracked concrete, dock plates – prevents caster jamming and sudden side loads.
How to estimate drum mass before choosing equipment
1) Read product density from the SDS (kg/L). 2) Multiply by 200 L nominal volume, adjusted for actual fill level (e.g., 90%). 3) Add drum tare mass (typically 15–25 kg for steel). Always round up and apply at least a 25% safety margin when selecting equipment capacity.
Manual rolling and upending: when and how to allow it
Manual rolling and upending of 55-gallon drums should be rare, tightly controlled exceptions with clear limits and defined techniques.
- No freehand lifting: Prohibit lifting a full drum by hand – 180–360 kg far exceeds manual limits and creates spinal injury risk.
- Limit to short distances: Allow rolling only for very short, flat movements – reduces cumulative strain and loss-of-control events.
- Side stance: Stand slightly offset from the drum path – keeps feet clear if the drum suddenly tips or kicks back.
- Use leg power: Bend knees, not back – transfers load to stronger leg muscles and reduces shear on lumbar discs.
- No crossed hands: Keep hands separated on the rim – prevents wrist entanglement if the drum surges forward.
- Use tools for upending: Apply drum lifter bars or wedges – moves the pivot point and cuts required force dramatically.
- Controlled lowering: Never “drop” the drum onto its head – avoids shock loads that can buckle thin heads and rupture seals.
- Step 1: Verify weight and contents – do not manually roll if mass is unknown or contents are highly hazardous.
- Step 2: Clear a 1–1.5 m wide corridor – gives recovery space if the drum veers sideways.
- Step 3: Tilt the drum slightly toward you using legs – establishes rolling without lifting the full mass.
- Step 4: Walk, do not run – keeps acceleration and deceleration low, reducing tipping moments.
- Step 5: If control is lost, let it go – prevents crush injuries from trying to “catch” a 300 kg object.
When to completely ban manual rolling
Ban manual rolling for: (1) any drum over rough or sloped floors, (2) corrosive or highly toxic contents, (3) bulging or badly dented drums, and (4) areas with bystanders or tight clearances where a runaway drum could not be contained.
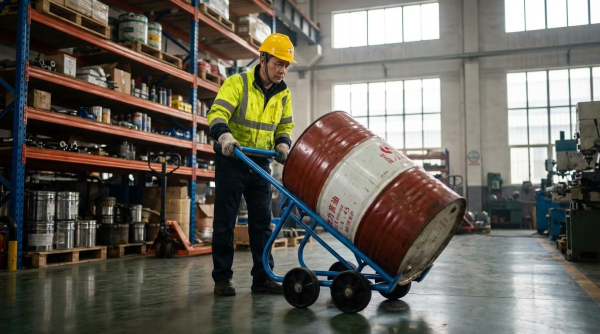
Drum dollies, trucks, and wheel selection criteria
Drum dollies and trucks are the primary engineered answer to how to safely handle a 55 gallon drum over short to medium distances.
| Equipment Type | Typical Capacity | Best For | Operational Impact |
|---|---|---|---|
| Low-profile circular dolly | ≥ 450 kg | Full steel drums on smooth floors | Keeps center of gravity low; easy 360° pivot in tight spaces. |
| Four-caster platform dolly | ≥ 450 kg | Plastic drums or mixed drum types | Full bottom support; reduces risk of rim damage and tipping. |
| Two-wheel drum truck | 300–450 kg | Short, controlled moves | Higher handle forces; needs trained operators for safe tilting. |
| Four-wheel drum truck | 450–700 kg | Longer distances, uneven floors | Lower push forces and better stability on slopes and joints. |
- Capacity margin: Specify dollies and trucks at least 25% above maximum drum mass – accommodates density variation and dynamic loads.
- Rigid frames: Use welded frames for steel drums – prevents racking when crossing expansion joints or dock plates.
- Rim vs base support: Prefer continuous base rings for plastic drums – avoids point loads that can crack thin rims.
- Wheel material: Choose hard poly or molded rubber on smooth concrete – minimizes push force for daily handling.
- Outdoor use: Use pneumatic or foam-filled tires outdoors – absorbs shocks from rough asphalt and thresholds.
- Corrosive zones: Specify stainless or coated hardware – maintains structural integrity in chemical splash areas.
- Braking: Fit foot brakes or wheel chocks on slopes – prevents unintended rolling during loading or paperwork stops.
Wheel diameter and floor compatibility
As a rule of thumb, use wheels ≥ 150 mm diameter on smooth indoor floors and ≥ 200 mm where you cross thresholds, cable protectors, or drain grates. Larger diameters reduce the “curb height” effect and cut the peak push force when starting movement.
💡 Field Engineer’s Note: If operators need more than roughly 25–30 kg of push force to start a loaded drum dolly, you either have the wrong wheel material or the wrong floor; fix the system, not the worker.
Pallet-based handling, stack limits, and load securement
Pallet-based handling is the safest default for how to safely handle a 55 gallon drum over longer internal routes and in storage areas.
| Parameter | Typical Practice | Operational Impact |
|---|---|---|
| Drums per pallet | 2–4 drums | Balances stability with handling efficiency in 1.0–1.2 m pallets. |
| Stack height | Max 2 drums high | Limits collapse risk and maintains inspection access. |
| Aisle width | ≥ 2.4 m | Allows pallet trucks to turn 180° without aggressive steering. |
| Containment volume | ≥ 110% of largest drum | Captures full contents in case of single-drum failure. |
- Pallet condition: Inspect deck boards and stringers – broken timber can punch into drum bases and cause leaks.
- Pattern loading: Place four drums tight in a square – creates mutual bracing and reduces rocking.
- Chocks and dunnage: Use wedges or rings at pallet edges – prevents outer drums from walking outward on vibration.
- Strapping or stretch wrap: Secure drums as a unit – improves stability on forklifts and trucks.
- Stack limits: Enforce maximum two-high stacking – higher stacks magnify the effect of small dents or weak pallets.
- Segregation: Separate incompatible chemicals on different pallets – reduces escalation if one drum fails.
- Staging zones: Designate flat, contained staging areas – controls spill pathways and traffic conflicts near docks and fillers.
Load securement for over-the-road transport
For external transport, fill pallet gaps with dunnage, use friction mats under pallets, and apply straps or chains according to transport codes. The goal is zero relative movement under braking, cornering, and minor impacts.
💡 Field Engineer’s Note: If you see drums “walking” on pallets during forklift travel, treat it as a near-miss: review pallet quality, containment, and strapping before a real spill happens.
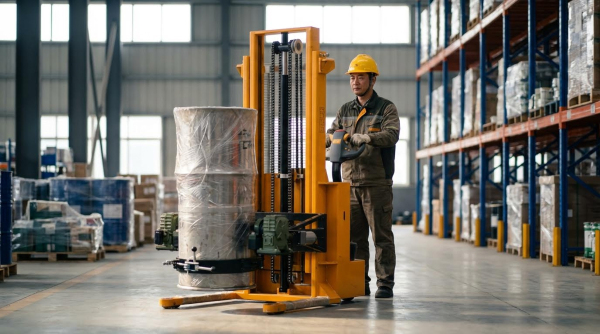
Forklift, hoist, and AGV drum attachments
Forklift, hoist, and AGV attachments transform general material-handling equipment into controlled systems specifically designed for how to safely handle a 55 gallon drum.
| Attachment Type | Typical Drum Range | Key Function | Operational Impact |
|---|---|---|---|
| Beak-style rim clamp | Steel drums, ~560–610 mm diameter | Grabs upper rim automatically | Fast loading/unloading when drums are accessible and undamaged. |
| Strap or belt grab | Steel and plastic, ~360–700 mm | Wraps around body | Handles mixed drum types with reduced rim damage risk. |
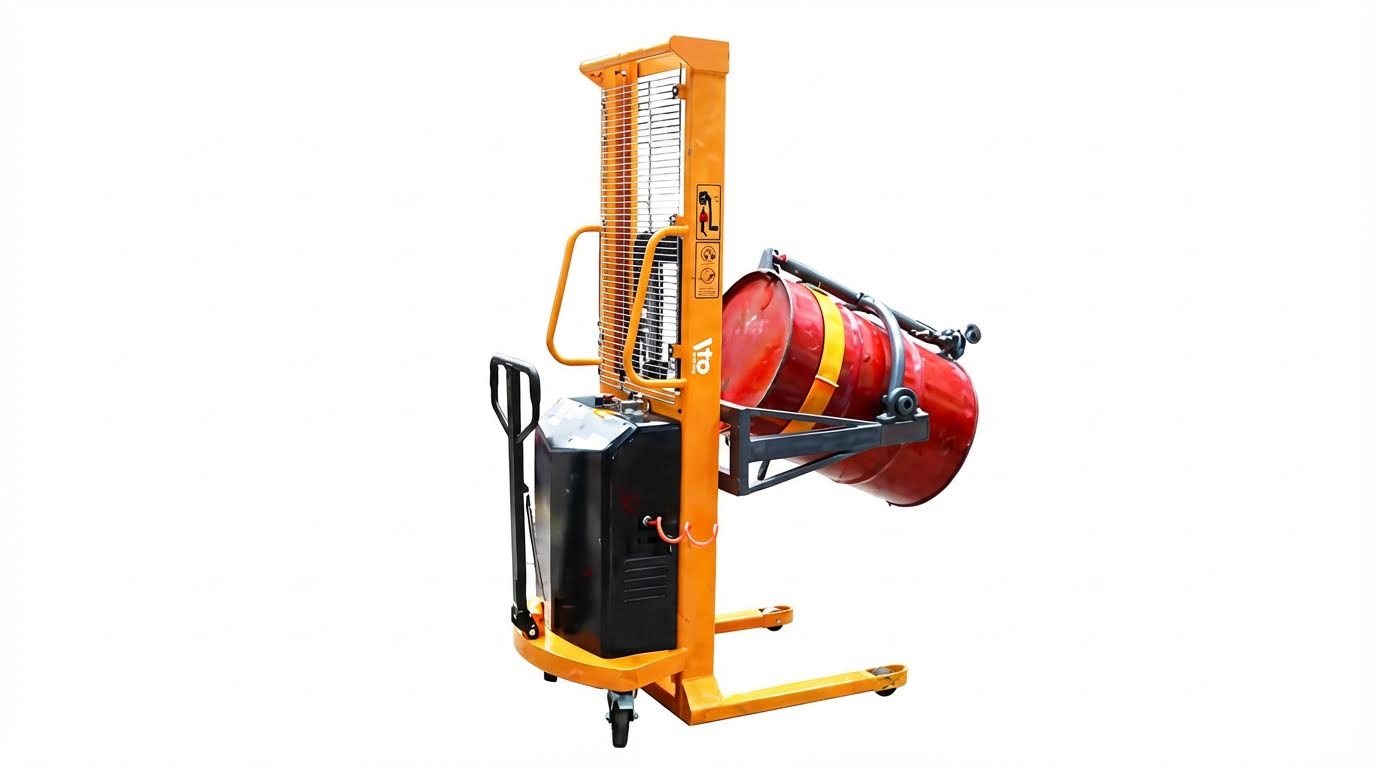
| Rotating drum handler | Up to ~900 kg | Tilt / invert for pouring | Allows controlled decanting without manual tipping. |
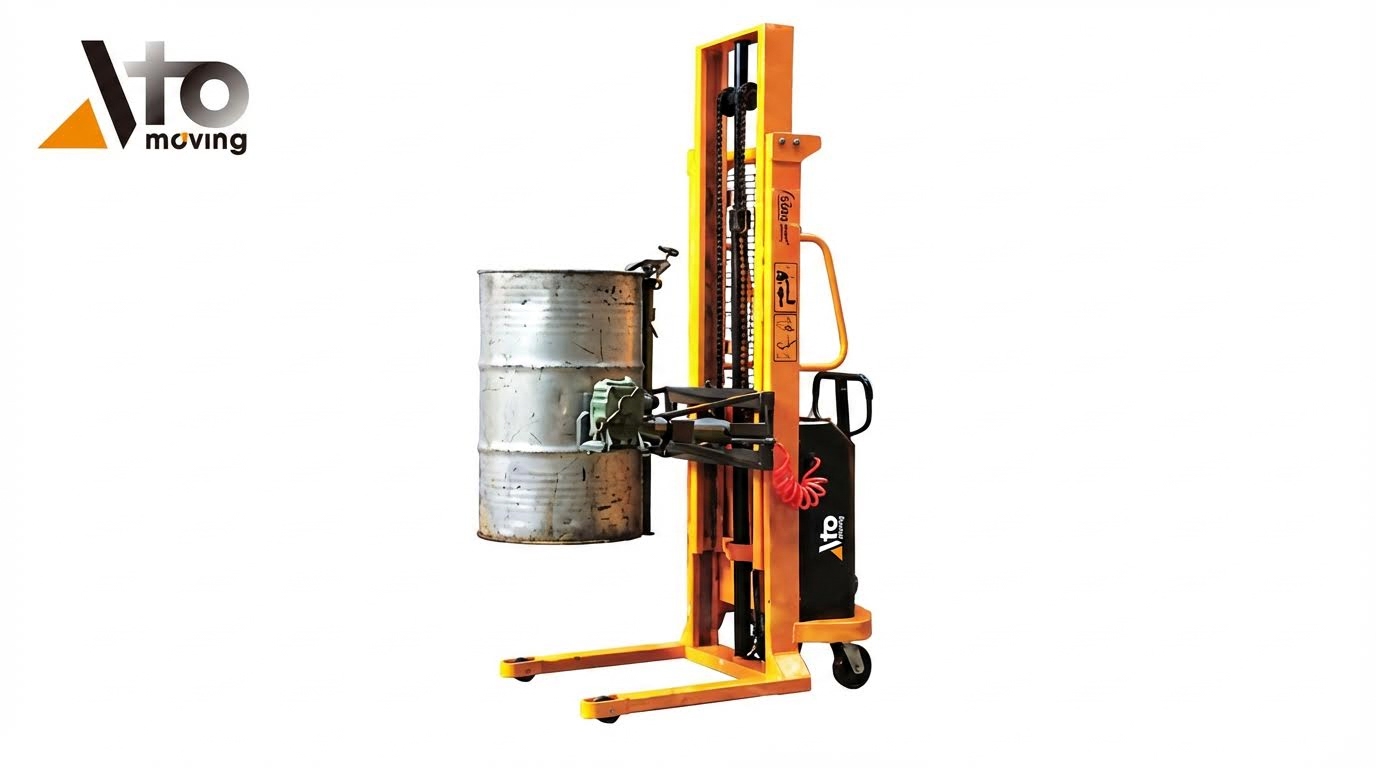
| Hoist drum lifter | Single or paired drums | Lifts vertically from rim or body | Serves mezzanines, pits, and confined spaces. |
| AGV pallet fork | Palletized drums | Automated pallet transport | Removes people from high-exposure routes. |
- Rated capacity: Match attachment plus load to truck/hoist rating – prevents overload and loss of stability.
- Center-of-gravity shift: Account for drum offset and rotation arms – reduces risk of front-axle overload on forklifts.
- Compatibility: Use rim clamps only on sound steel rims – damaged or thin rims can slip out under shock.
- Positive locking: Prefer attachments with mechanical locks or latches – prevents accidental release if hydraulics drift.
- Speed limits: Set reduced travel speeds with raised drums – cuts dynamic tipping forces in turns and on ramps.
- AGV routing: Program wide, predictable paths – minimizes tight turns and mixed-traffic conflicts.
- Inspection and maintenance: Check jaws, straps, and pivot pins regularly – avoids sudden grip loss during lifting or pouring.
Safe use of rotating drum handlers
Always rotate drums only within designated zones, with exclusion areas marked on the floor. Start rotation slowly to avoid slosh-induced surges, especially with partially filled drums, and never stand under or directly beside the swing path.
💡 Field Engineer’s Note: Most serious drum incidents with forklifts happen at low height but high speed; the safer choice is slow travel with the drum just clear of the floor and the mast tilted slightly back for every move.

Final Thoughts On Building A Drum Handling Safety Program
Safe handling of 55-gallon drums depends on one idea: treat every drum as a heavy, unstable system, not a package. The article showed how mass, center of gravity, and support geometry turn each move into a stability problem. Engineering controls then solve that problem by lowering the drum, widening the base, and locking the load so it cannot escape during shocks or turns.
Regulations from OSHA, EPA, DOT, and NFPA give the legal frame. However, real safety comes when you convert those rules into clear field limits: no-lift policies, defined stack heights, labeled routes, and strict criteria for when manual rolling is banned. Purpose-built equipment, from dollies to pallet systems and powered attachments, lets operators move drums without using their bodies as the last line of defense.
The best programs follow one standard playbook. They require pre-move inspection, match tools to drum mass and contents, and control speeds and routes. They also drill operators on what to do when control is lost: step away, contain, report, and never try to “save” the drum. If you combine sound physics, compliant layouts, and disciplined procedures, your site can move every drum with the same controlled, repeatable safety margin—shift after shift. Atomoving equipment and methods fit naturally into that disciplined, engineered approach.
Frequently Asked Questions
How to safely move a 55 gallon drum?
To safely move a 55-gallon drum, you can use techniques like pushing or pulling. For pushing, place your hands near the chime at shoulder width, move your shoulders low and close to the drum, and slowly push forward with your legs until the drum reaches its balance point. USDA Drum Moving Guide.
- Use proper body mechanics to avoid strain.
- Ensure there is enough space to maneuver the drum safely.
How do you lift a 55 gallon drum?
Lifting a 55-gallon drum safely requires using drum lifting equipment rated for the drum’s full weight. Position the drum lifter around the drum’s center of gravity, usually at the upper third. Engage the lifting mechanism fully before lifting, move slowly, and maintain good body position. Drum Lifting Equipment Guide.
- Always use equipment designed for drum handling.
- Ensure the lifting equipment is properly rated for the load.