If you are asking “how do I reset my scissor lift,” you are really asking two things: how to clear simple faults safely, and how to recognise problems that need a technician. This guide walks through common fault types, how the safety and control circuits affect reset, and a step‑by‑step reset and troubleshooting sequence. You will also learn when to stop cycling power and start calling for expert help to protect people, equipment, and warranties. Every section focuses on practical checks, clear decisions, and safe habits rather than guesswork.
Understanding Scissor Lift Faults And Reset Logic
Typical fault categories affecting reset
When operators ask “how do i reset my scissor platform,” the real issue is usually the fault behind the trip, not the reset button itself. Most reset problems fall into a few repeatable categories: electrical, control logic, hydraulic, and battery or power issues.
| Fault category | Typical symptoms during/after reset | What usually causes it | Operator‑level checks |
|---|---|---|---|
| Battery / power supply | Lift dead or weak after restart; display flickers; functions slow or stop under load | Low charge, sulphated or aged batteries, poor connections, or charger not working Battery troubleshooting and replacement indicators |
|
| Electrical protection (fuses, breakers) | No response from one or more functions even after cycling power | Blown fuses or tripped breakers from shorts, overloads, or wiring damage Fuse check recommendations |
|
| Control panel & switches | Buttons unresponsive or intermittent; some functions work from lower controls but not from platform (or vice versa) | Contaminated or worn buttons, loose wiring, damaged display or selector switches Control panel button and display issues |
|
| Hydraulic fluid level & leaks | Lift will not rise or stops part‑way; motion jerky even after reset | Low hydraulic oil, trapped air, or external leaks in hoses and fittings Hydraulic level and leak checks Air bleeding procedure |
|
| Hydraulic startup / trapped air | Newly installed or serviced lift rises slowly, unevenly, or not at all on first runs | Air pockets in cylinders and lines after installation or major service Hydraulic air bleed guidance |
|
| Safety devices & interlocks | Lift powers on but refuses to move; alarms or error codes stay after reset | Emergency stop engaged, guardrails or gates not secured, tilt or overload sensors active, or outriggers not deployed Safety control and sensor checks |
|
Most “won’t reset” complaints trace back to one of these categories. Cycling the key or main power may clear a minor software glitch by turning the machine off and restarting it, but it will not fix low oil, a blown fuse, or an engaged safety circuit.
Operator checklist before attempting multiple resets
- Confirm batteries are charged and charger has indicated a full cycle
- Walk around the lift to check for hydraulic leaks or structural damage
- Verify all guardrails, gates, and stabilizers are properly set
- Inspect visible fuses and connectors for obvious damage
- Review the operator’s manual for model‑specific reset instructions
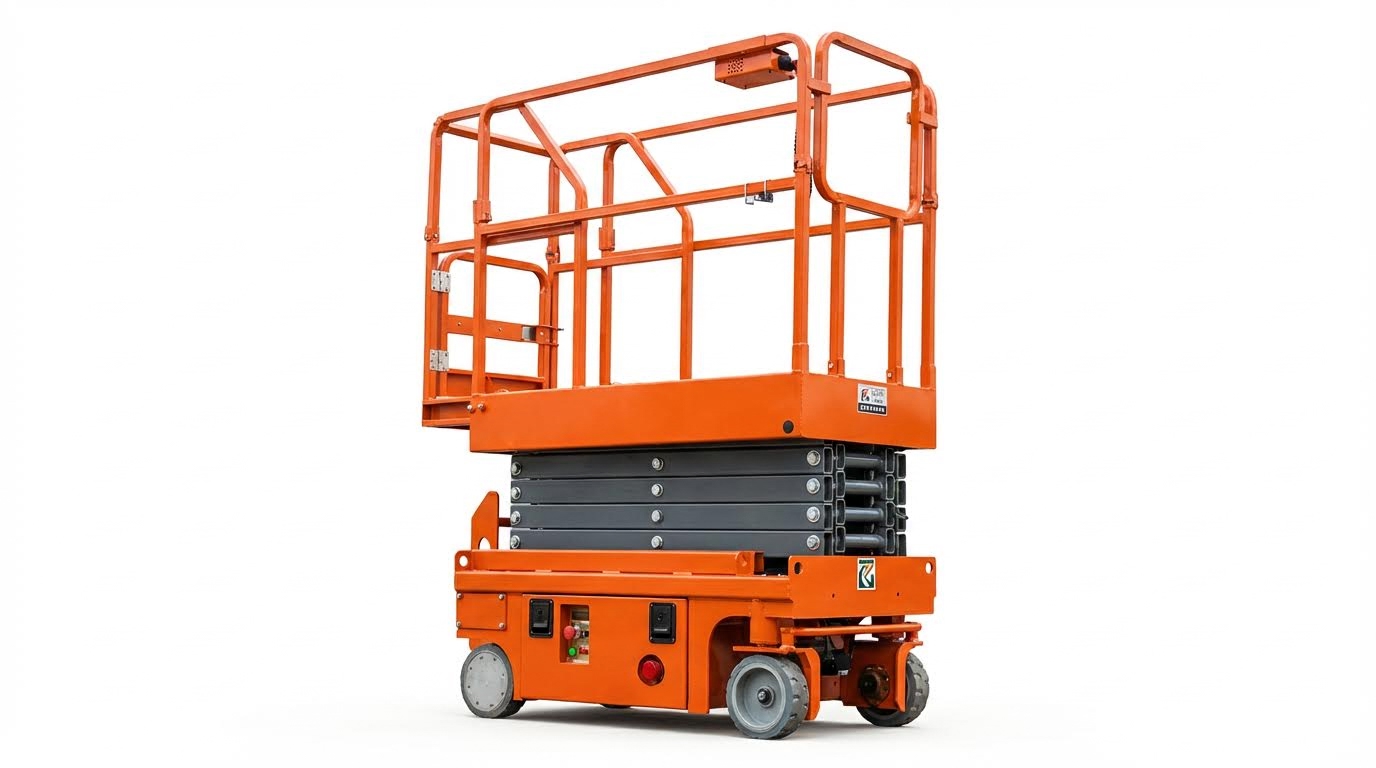
How scissor lift control and safety circuits interlock
Understanding the interlocks is essential if you are asking “how do i reset my scissor platform lift” and the machine still will not move. The control and safety circuits are designed so that one unsafe condition anywhere in the chain can block all motion, even when power and hydraulics look fine.
In most modern lifts, the logic ties together power, controls, and safety devices in a strict sequence. If that sequence is broken, the controller either refuses to energize the hydraulic valves or immediately stops motion and logs a fault.
- Power chain interlocks
- Main disconnect or key switch must be ON
- Battery or power supply must be within the acceptable voltage range
- Critical fuses and contactors must be closed and healthy
- Control chain interlocks
- Lower and upper control stations are usually mutually exclusive; only one is active at a time Control testing requirements
- Emergency stop buttons must be released at the active station
- Function enable or “deadman” switches must be held to move
- Safety chain interlocks
- Guardrails, gates, and access doors must be closed and latched Guardrail and safety control checks
- Tilt sensors inhibit elevation if the chassis is outside the safe angle
- Overload sensors block lift if platform weight exceeds the limit
- Outriggers or stabilizers must be deployed and confirmed, where fitted Brake and stabilizer checks
Because these circuits are interlocked, a reset only works if the physical condition that caused the fault is cleared. For example, cycling power will not override a tilt sensor on a steep slope or a gate switch that shows “open.” The controller keeps the fault active until all safety inputs report a safe state.
Typical interlock sequence before the lift will move
- Operator turns key ON and releases all emergency stops.
- System checks battery voltage and main fuses for continuity.
- Controller verifies that no critical error is latched from the previous cycle.
- Safety inputs (tilt, overload, guardrail/gate switches, stabilizers) must all read “safe.”
- Operator selects control station (lower or upper) and holds the enable control.
- Only then does the controller allow UP/DOWN or drive commands to energize the hydraulic valves.
For safe and effective resets, operators should treat the machine as a logic chain, not just a hydraulic platform. Working through power, controls, and safety interlocks in order is far more reliable than repeated key‑cycling and guessing at the fault source.
Step‑By‑Step Safe Reset And Troubleshooting Process
Pre‑reset safety checks and lockout steps
If you are asking “how do I reset my scissor lift,” start with safety, not buttons. A systematic pre‑reset check prevents accidental movement and electric shock during troubleshooting. Always follow your site lockout/tagout rules before touching panels or hydraulics.
- Park on firm, level ground, lower the platform fully, and chock wheels if on any slope.
- Remove the key and turn the main power off before opening any covers.
- Apply lockout/tagout devices to the main disconnect or battery isolator according to site rules.
- Visually scan for obvious hazards: damaged guardrails, bent structure, oil on the floor, hanging wires, or burnt smells. Daily pre‑operation checks normally include structure, hydraulics, and controls.
- Confirm the emergency stop buttons at both upper and lower controls operate and latch correctly (push in, twist or pull to reset). Both control stations should be tested before use.
- Keep all personnel clear of the platform and scissor stack before any reset attempt.
Quick pre‑reset checklist (printable)
- Ground level, area clear of overhead obstructions and debris. Site assessment should verify stable, flat support.
- Guardrails, gates, and toe boards intact and locked.
- No visible hydraulic leaks or puddles under the machine. Oil stains or wet hoses indicate faults.
- Tyres/wheels undamaged; brakes and stabilizers or outriggers (if fitted) engaged. Stabilizers provide extra anti‑tip support.
- Emergency stops tested; all controls respond correctly in a low‑level test.
Basic electronic and control panel reset methods
The simplest answer to “how do I reset my scissor lift” is often a controlled power cycle. Many minor control glitches and display errors clear when the machine is fully powered down and restarted. Always stand clear of moving parts when restoring power.
- Turn the platform and base controls to the OFF position and ensure emergency stops are pushed in.
- Switch off the main power or battery isolator and wait 30–60 seconds for electronics to discharge.
- Turn the main power back on, release the emergency stop, then select the correct control station.
- Attempt a low‑risk function first, such as a small steer or drive command at ground level.
- If the fault code clears and normal operation returns, document the event and monitor the machine.
For persistent electronic faults, work through simple, non‑intrusive checks before assuming major failures.
| Item | What to check | Why it matters |
|---|---|---|
| Fuses | Inspect for blown elements; replace only with identical rating. Regular fuse checks help prevent unexplained dead circuits. | A blown fuse can disable controls, sensors, or drive functions. |
| Control buttons | Look for stuck, dirty, or physically damaged buttons. Clean and re‑test. Unresponsive buttons are often caused by dirt or wear. | Sticky or broken buttons can mimic electrical faults or prevent reset. |
| Display / indicator | Check for power, cracked screens, or error messages. Restarting the system may clear display glitches. | Blank or incorrect displays can hide active fault codes. |
| Wiring at controls | Look for loose plugs, pulled wires, or corrosion at connectors. | Poor connections cause intermittent faults that reappear after reset. |
Step‑by‑step electronic reset flow
- Confirm safe condition and lockout as described in the previous section.
- Visually inspect the control panel for physical damage or obvious loose wiring.
- Check fuses and replace any blown units with the specified rating. Keeping spare fuses reduces downtime.
- Clean dirty or sticky buttons and re‑seat any loose connectors at the panel.
- Perform a full power‑off / power‑on cycle as described earlier.
- Check the display for cleared codes or new error messages and record them.
- If errors persist or the display remains blank despite confirmed power, stop and plan for technician support.
Hydraulic and battery checks before repeated resets
Repeatedly cycling power will not fix hydraulic or energy‑supply problems. Before multiple reset attempts, confirm that batteries and hydraulics can actually support lift and drive functions. This reduces wear on contactors and protects pumps from running dry.
| System | Check | Typical findings | Action |
|---|---|---|---|
| Battery – charge | Verify the charger is powered, cables intact, and indicator lights working. Charging issues often start with power source or cabling. | Lift runs only briefly, moves slowly, or will not elevate. | Charge fully; do not keep resetting a low‑voltage machine. |
| Battery – condition | Look for swelling, corrosion, or leaking electrolyte. Note if runtime has dropped or charging is very slow. Shorter operating time and frequent recharging indicate end‑of‑life batteries. | Frequent resets needed to clear low‑voltage or power‑related fault codes. | Plan battery replacement; test lift after installing new units. |
| Hydraulic fluid level | With lift lowered and power off, inspect reservoir via dipstick or sight glass. Low fluid can prevent proper lifting. | Platform fails to rise fully or moves erratically. | Top up only with the specified fluid type; investigate cause of loss. |
| Hydraulic leaks | Inspect hoses, fittings, and cylinders for wet spots or drips. Listen for unusual pump noise. Leaks and strange noises often occur together. | Oil on floor, spongy lifting, or noisy pump. | Do not keep resetting; isolate machine and arrange repair. |
| Air in hydraulic system | On first startup, the platform may not rise or only move partially due to trapped air. Bleeding air through a bleed bolt while running UP can restore smooth motion. | Jerky or limited lift movement on a new or newly serviced unit. | Only a trained person should bleed air from the pump using the manufacturer’s procedure. |
- If the platform still will not rise after a confirmed good battery and fluid level, avoid further reset attempts to protect the pump.
- Listen during a short test: high‑pitched whining suggests low oil or air; grinding suggests mechanical damage. Unusual sounds during a test lift are a key inspection item.
- Record all symptoms, fault codes, and checks completed; this information is vital if a technician must be called.
When to stop resetting and shift to maintenance
- Any visible hydraulic leak, structural damage, or burning smell.
- Repeated low‑voltage or hydraulic‑related fault codes after a full charge and fluid top‑up.
- Controls or emergency stops that do not respond consistently even after cleaning and inspection.
- Display errors that return immediately after each power cycle. Persistent display faults usually require professional service.
When To Stop Troubleshooting And Call A Technician
Red‑flag symptoms that indicate deeper failures
If you are asking “how do i reset my scissor lift” and simple power cycling has not cleared the fault, you must know when to stop. Persistent resets on a sick machine increase the chance of structural, hydraulic, or electrical failure. Use the list below as a hard stop: when you see these, isolate the lift and call a qualified technician.
- Emergency stop or safety devices will not reset
• E‑stop button will not twist/pull out or remains latched.
• Guardrails, gates, or interlocks are loose, bent, or not engaging properly.
• Safety sensors or tilt/overload alarms stay active even on level ground with no load. - Repeated faults immediately after a normal reset
• You power the unit off, wait, and restart, but the same fault code or beeping returns right away. Basic restart can clear only minor glitches by cycling the machine off and on. If the fault is instant and repeatable, there is an underlying problem. - Abnormal hydraulic behavior
• Platform will not rise, drops unexpectedly, or moves in jerks even with correct fluid level.
• You have already checked for obvious leaks and fluid level issues by inspecting hoses and reservoir, but symptoms remain.
• Loud grinding, screeching, or cavitation noises continue after basic bleed attempts or simple tests. - Visible structural or mechanical damage
• Cracks, deformation, or heavy rust on scissor arms, welds, platform, or base frame.
• Bent rails, damaged anchor points, or loose pins and fasteners on the scissor stack.
• Tires, wheels, or stabilizers visibly damaged, misaligned, or not locking firmly. - Electrical burning signs or repeated fuse failures
• Smell of burnt insulation, visible smoke, melted connectors, or discolored wiring.
• Fuses blow again immediately after you replace them with the correct rating as part of routine fuse checks.
• Control panel goes blank, flickers, or shows nonsense data even after you confirm battery charge and restart the system as recommended for display errors. - Severe battery or charger problems
• Battery fails to hold charge at all, or the lift dies suddenly under light load despite recent charging.
• Charger indicator lights show no activity even after you verify the power source and cable condition during charging checks.
• Battery case is swollen, cracked, leaking, or excessively hot. - Uncontrolled or unexpected movement
• Lift moves without input, continues moving after you release the control, or does not stop smoothly.
• Platform drifts down while controls are neutral and no lowering command is given.
• Brakes or stabilizers do not hold, or the machine creeps on level ground even though they appear engaged where proper brake and stabilizer function is critical. - Any fault while people are elevated
• If alarms, jerky motion, or control failures occur with workers in the air, do not attempt further resets from the platform.
• Use emergency lowering as per the manual, evacuate, tag out the lift, and bring in a technician.
Why these symptoms are “stop now” conditions
These red flags usually point to component-level failures in hydraulics, structure, or electrics that simple “how do i reset my scissor lift” steps cannot fix. Continuing to cycle power, swap fuses, or bleed hydraulics without diagnostics can mask root causes and create sudden collapse, tip, or fire risk. Treat any combination of these symptoms as a lockout and service event.
Compliance, documentation, and warranty considerations
Knowing when to call a technician is not just about technical limits. It also affects legal compliance, warranty protection, and your maintenance record. A disciplined approach here protects people first and also protects your budget.
- Follow mandatory inspection and service intervals
• Many jurisdictions and standards required periodic inspections and maintenance every few months or after defined operating hours. Typical guidance called for checks every 3–6 months or based on hour meters to ensure safety compliance.
• If the lift is used heavily, outdoors, or in harsh conditions, you should shorten these intervals because wear accelerates under rough environments due to usage intensity and environmental factors.
• If the calendar or hours say an inspection is due, or overdue, stop DIY troubleshooting and book a service visit. - Respect the limits of operator‑level troubleshooting
• Operator checks typically include visual inspections, basic function tests, checking for leaks, and simple resets or fluid top‑ups as part of daily pre‑operation checklists.
• Once you move into tasks like opening control boxes, bypassing switches, or altering hydraulic settings, you leave operator scope and risk violating safety rules and insurance terms.
• If the fault cannot be cleared using only the pre‑operation checklist steps and a basic restart, escalate to maintenance or an external technician. - Protect warranty and liability coverage
• Warranties and service agreements often required that maintenance follow the manufacturer’s schedule and procedures, including lubrication, inspections, and part replacement intervals as outlined in operator manuals.
• Unapproved modifications, bypassed safety devices, or undocumented “home fixes” can void warranties and shift liability to the owner or employer.
• If a fault appears linked to a component that may still be under warranty (e.g., major hydraulic or electrical assemblies), stop work and call an authorized technician rather than trying to repair it in‑house. - Maintain detailed maintenance and fault records
• Keep logs of all inspections, faults, resets, repairs, and parts replaced. A structured preventive maintenance program with records reduced unexpected failures and supported compliance audits by documenting inspections and component replacements.
• When a recurring fault appears in the log, use that pattern as a trigger to stop basic troubleshooting and request a deeper diagnostic visit.
• Good records also help technicians fix the problem faster, reducing downtime. - Ensure trained personnel handle advanced troubleshooting
• Regulations and best practice expected that operators and maintenance staff were trained in correct use, inspection, and servicing procedures with formal training and documentation.
• If no one on site has documented training or authorization for electrical or hydraulic diagnostics, do not attempt to “learn on the fly” on a live lift.
• In that case, even relatively simple‑looking faults should go straight to a qualified technician.
Practical rule‑of‑thumb for operators
If your actions stay within the operator manual’s daily/weekly checks and a simple restart, you are likely within safe scope for “how do i reset my scissor lift”‑type tasks. The moment you face repeating faults, red‑flag symptoms, overdue inspections, or anything that requires tools beyond basic hand tools and visual checks, lock out the lift and call a technician. This approach keeps you compliant, protects warranties, and, most importantly, keeps people off an unsafe platform.
Final Thoughts On Safe Scissor Lift Resets
Safe scissor lift resets depend on understanding faults, not just pressing buttons. Electrical, hydraulic, control, and safety‑chain issues all leave clear clues. When operators read those clues correctly, they avoid turning a simple reset into a major failure.
The control logic links power, controls, and safety devices into one chain. A reset only works when every link is sound. That means correct battery voltage, healthy fuses, clean switches, proper hydraulic level, and all guards, gates, and sensors in a safe state. Ignoring any link invites sudden stops, loss of motion, or uncontrolled movement.
A disciplined reset process keeps people safe and protects the lift. Start with lockout and visual checks. Use one controlled power cycle, then basic electrical, battery, and hydraulic checks. If faults repeat, or red‑flag symptoms appear, stop. Do not bypass switches, guess at wiring, or keep cycling power.
Operations and engineering teams should set a clear rule: operators handle visual checks, simple resets, and basic fluid or battery checks. Anything beyond that, or any repeated or severe fault, goes to a trained technician or an Atomoving support partner. This line keeps platforms safe, preserves warranties, and reduces downtime in the long run.
Frequently Asked Questions
How do I reset my scissor lift?
To reset your scissor lift, start by removing any weight from the platform. Next, push in and pull out the red Emergency Stop button to reset the system. If the platform is still overloaded, the warning light will continue to flash. Scissor Lift Manual.
What should I do if the scissor lift doesn’t reset?
If the lift does not reset using the Emergency Stop button, try this alternative method: On the control pad with the up and down arrows, press and hold the down arrow until the lift reaches its lowest point. Continue holding the button for 10 seconds, then release to reinitialize the lift. Lift Reset Instructions.

