Knowing how to handle 55 gallon drums safely means managing 180–360 kg loads from truck gate to final recycling without injuries, spills, or fire risk. This guide walks you through engineering controls, storage design, and operating practices that keep people, product, and facilities protected across the full drum lifecycle.
Fundamentals Of 55-Gallon Drum Handling Safety
Fundamentals of 55-gallon drum handling safety explain how to handle 55 gallon drums without exceeding human limits, losing stability, or mismanaging unknown contents from the very first touch.
This section focuses on two pillars: knowing the real mass and stability limits of 200 L (55-gallon) drums, and locking in a disciplined inspection and SDS check before any movement.
Drum weights, stability, and ergonomic limits
Drum weights, stability, and ergonomic limits define the physical boundaries that make how to handle 55 gallon drums safe instead of a high-risk guessing game.
A typical 55-gallon drum weighs roughly 180–360 kg when full, depending on product density. Manual lifting or “man-handling” a full drum is outside any reasonable ergonomic guideline and should be treated as prohibited for a single worker. Reference data show that even the low end of this range far exceeds recommended manual lift limits.
| Parameter | Typical Range / Condition | Risk Mechanism | Operational Impact |
|---|---|---|---|
| Full drum mass | 180–360 kg | Exceeds individual lift capacity | Requires mechanical aids; no solo lifting or “wrestling” drums |
| Empty steel drum mass | 20–25 kg (typical) | Still awkward, large moment arm | Use proper posture or aids; avoid twisting while lifting |
| Center of gravity (upright) | ~450–600 mm above floor | Narrow base, tall column | Toppling risk if pushed, struck, or on uneven floors |
| Rolling on chime | Common short-distance method | Runaway or foot crush hazard | Always use two people and clear, smooth paths |
| Manual tilting from horizontal to vertical | Moment at hands often >300–400 Nm | Back and shoulder overload | Use drum trucks/handlers instead of brute-force tipping |
Because the drum is tall with a small footprint, stability is marginal even on level floors. Any slope, pothole, or impact can quickly move the center of gravity outside the base and cause a tip-over, especially during rolling or cornering with trucks and dollies.
- Mass awareness: Assume every closed, unlabeled drum is at the high end of the 180–360 kg range – this prevents underestimating forces during pushing, catching, or restraining a moving drum.
- No solo catching: Never try to “catch” a falling drum – the energy in a 200+ kg drum can easily exceed human joint strength.
- Two-person rule for rolling: Use two people when chime-rolling – one controls direction, the other manages speed and obstacles.
- Short push distances only: Limit manual pushing/rolling to short, flat, smooth routes – long distances multiply fatigue and loss-of-control risk.
- Prefer mechanical aids: Default to drum carts, dollies, and palletized handling – this shifts load from the spine to engineered structures.
How to estimate if a drum is “too heavy” for manual handling
Assume any full 55-gallon drum is 180–360 kg. Compare this to typical single-person lift limits of 20–25 kg. If you must tilt, push, or arrest its motion, the effective force at your hands can easily exceed 4–8 times safe ergonomic limits because of leverage and dynamic effects. That gap is your red flag to use mechanical equipment instead of manual muscle.
💡 Field Engineer’s Note: On slightly sloped floors (even 1–2%), a chime-rolling drum can accelerate faster than expected. I have seen drums “walk away” from operators and cross an aisle before anyone could react. Always orient drums so any uncontrolled roll would head into a barrier, not into traffic or people, and treat every floor as if it has a slope.
Pre-handling inspection and SDS verification
Pre-handling inspection and SDS verification ensure you know what is inside the drum and whether the shell can survive movement before you apply any force.
Before deciding how to handle 55 gallon drums, you must assume that any unseen defect or unknown chemical can turn a simple move into a spill, fire, or over-pressurization event. A quick but systematic inspection and paperwork check removes most of that uncertainty.
- Check for structural damage: Inspect for dents, corrosion, gouges, or impact marks – these weaken the shell and chimes and can fail under lifting or rolling loads.
- Verify closures: Confirm both bungs or the lid are present, undamaged, and fully tightened – loose closures are the fastest path to leaks during movement.
- Watch for bulging: Treat any bulged or distorted lid as over-pressurized – do not move it until engineering or EHS evaluates it.
- Confirm labels: Cross-check drum label against the Safety Data Sheet (SDS) – this drives PPE, ventilation, and ignition-control requirements.
- Handle unknowns as hazardous: If labels are missing or unreadable, classify the drum as hazardous – this prevents under-controlling flammable, toxic, or reactive contents.
Reference guidance emphasizes that pre-handling inspection should always precede movement and that missing or unreadable labels require treating the drum as hazardous until properly identified. Source for inspection practices
- Step 1: Scan the environment – make sure you have space, lighting, and a clear escape path before approaching the drum.
- Step 2: Walk around the drum – look for leaks, staining on the floor, rust, or deformation that could signal loss of integrity.
- Step 3: Inspect closures – ensure bungs or lid rings are seated and not cross-threaded or partially open.
- Step 4: Read the label – identify product name, hazard class, and any special handling notes.
- Step 5: Pull the SDS – verify PPE, incompatibilities, and whether the material is sensitive to shock, heat, or vibration.
- Step 6: Decide handling method – select equipment and route that match both the drum’s condition and the SDS hazards.
What to do if the drum appears over-pressurized
If the lid or bungs look bulged, do not attempt to vent or move the drum yourself. Isolate the area, prevent ignition sources, and contact engineering or environmental health and safety. Over-pressurized drums can rupture violently if mishandled, especially if internal reaction or heating caused the pressure.
💡 Field Engineer’s Note: In mixed-chemical warehouses, the biggest failures I have seen started with “just moving an unmarked drum out of the way.” Build a hard rule: no label + no SDS = no movement except under a documented hazardous-drum protocol. This one habit eliminates many low-probability but high-consequence accidents.
Engineering Controls For Moving And Storing Drums
Engineering controls for moving and storing 55-gallon (200 L) drums mean you design equipment, layouts, and containment so people never have to “muscle” 180–360 kg loads. This is the core of how to handle 55 gallon drums safely and efficiently.
The right drum trucks, dollies, forklifts, racks, and sumps turn high-risk manual handling into repeatable, low-strain tasks. Done correctly, you cut injury risk, spill probability, and lifetime maintenance costs at the same time.
Selecting drum trucks, dollies, and forklift tools
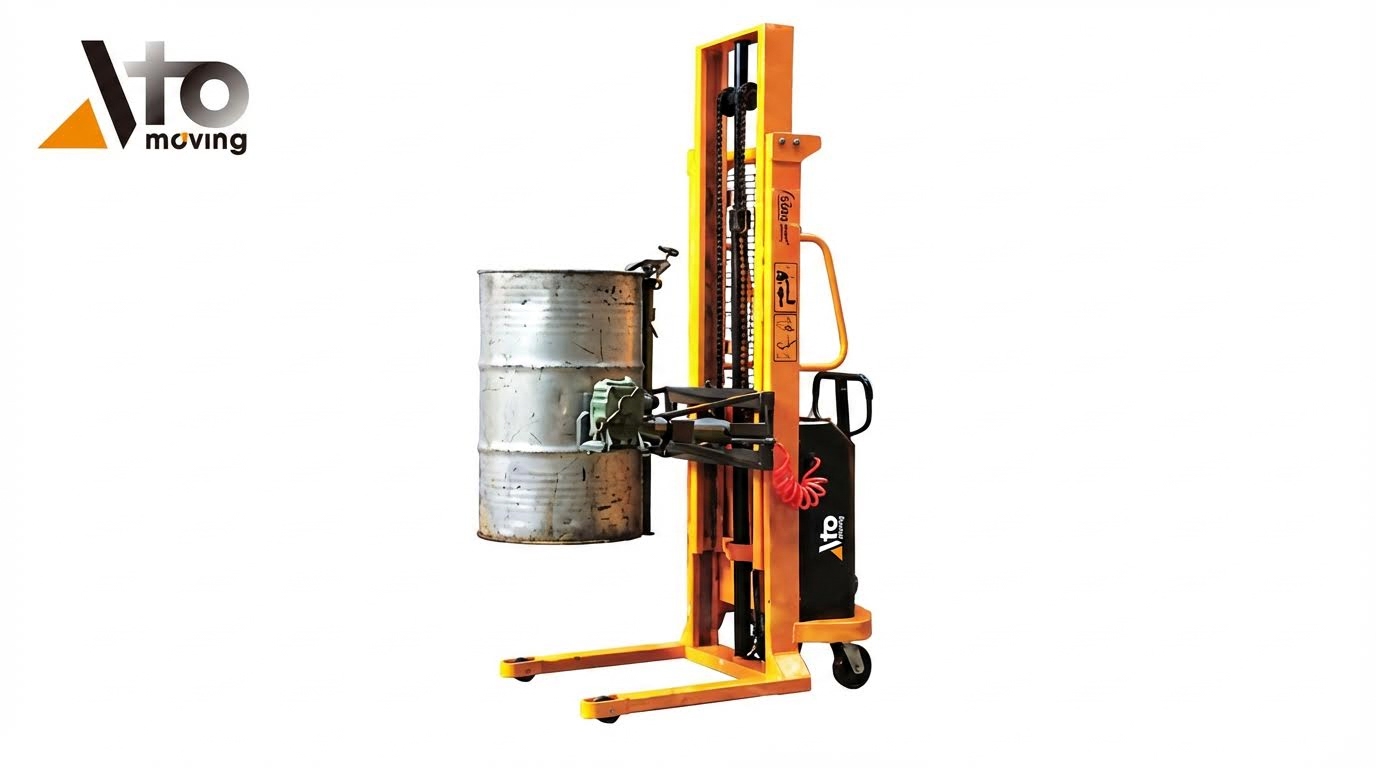
Drum trucks, dollies, and forklift attachments are the primary engineering controls that replace manual lifting when deciding how to handle 55 gallon drums across a site.
Full 55-gallon drums typically weigh 180–360 kg depending on contents, which exceeds safe individual manual handling limits and creates major stability risk if pushed or rolled by hand. Manual movement of full drums is rarely acceptable.
| Equipment Type | Typical Use Case | Key Engineering Considerations | Operational Impact |
|---|---|---|---|
| Drum dolly (4-wheel) | Short, flat moves on smooth floors | Wheel diameter, floor condition, drum retention (ring or recess) | Reduces push force and tipping; best for moves within one room or bay |
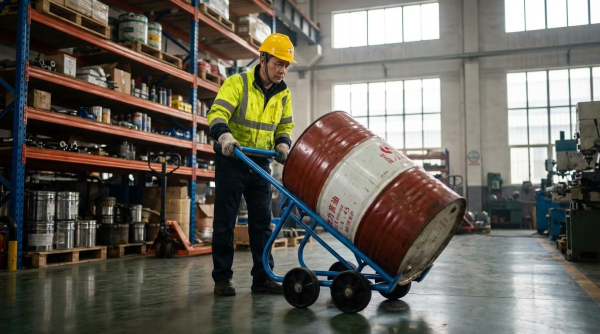
| Drum hand truck with curved back | Frequent single-drum moves, minor thresholds | Curved back matches drum radius, strap or chain to secure, wheel size | Improves control over 180–360 kg drums, allows tilting without full lift |
| Dedicated drum cart (cradle style) | Horizontal transport and occasional tilting/pouring | Rated capacity, center of gravity when tilted, brake or chock provision | Allows controlled rotation for dispensing while keeping operator clear |
| Forklift with drum-rated pallet | Bulk moves of 2–4 drums on pallets | Pallet condition, fork spacing, truck capacity vs pallet + drum mass | Fast handling over long distances; minimizes touch points per drum |
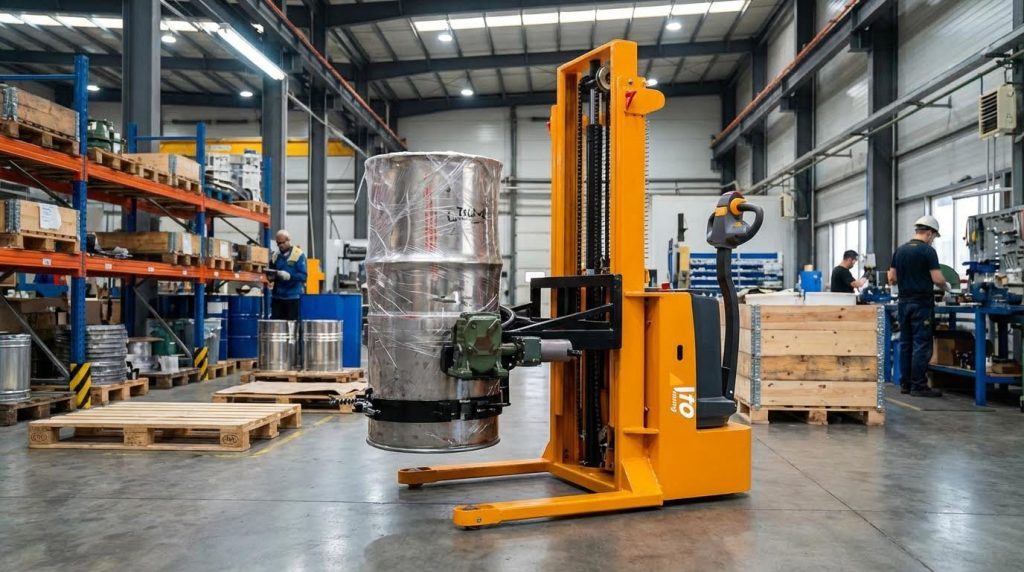
| Forklift with drum clamp / rim grip | Picking individual drums off pallets or from containment | Attachment rating plate, derated truck capacity, gripping surface condition | Secure vertical lift of single drums in tight spaces or from sumps |
For horizontal transport over moderate distances, drum dollies, curved-back hand trucks, and dedicated drum carts minimize manual strain and improve control compared with rolling drums on their chimes. These tools are specifically recommended for horizontal transport.
When you use forklifts, only drum-rated pallets in good condition should carry 55-gallon drums, and the truck’s rated capacity must exceed the combined mass of drums, pallet, and any attachment with a safety margin. Dedicated drum clamps or rim-grip devices increase stability when lifting single drums from pallets or containment areas, but every attachment must have a rating plate and be included in the truck’s derated capacity calculations. Source: engineering guidance on equipment selection.
- Use wheels, not backs: Select dollies and trucks so no one ever lifts more than the initial tipping force – this keeps forces within ergonomic limits.
- Match tool to floor: Larger, softer wheels for rough floors; smaller, harder wheels for smooth concrete – this reduces push force and vibration.
- Secure the drum: Straps, chains, or formed cradles prevent slip when crossing thresholds – this mitigates sudden tip-over risk.
- Derate forklifts correctly: Always factor attachment weight and new center of gravity – this preserves truck stability and prevents mast overload.
How to choose between a dolly, hand truck, and forklift
For distances under about 15–20 m on flat floors, a dolly or drum hand truck is usually sufficient. For repeated moves, slopes, or more than two drums at a time, a forklift with pallets or a drum clamp is safer and more efficient. Where aisles are narrow, a compact drum cart or walk-behind drum handler often beats a full-size truck.
💡 Field Engineer’s Note: On slightly sloped floors (even 1–2%), a loaded drum on a basic dolly can “walk” on its own once moving. Always choose dollies with effective brakes or wheel chocks for loading bays and ramps, and never stage drums on wheels without a positive stop.
Overhead handling, rigging, and structural checks
Overhead handling of 55-gallon drums relies on hoists, cranes, and rigging that are structurally verified for worst-case dynamic loads, not just static drum weight.
Where floor access is constrained, overhead solutions like hoists or jib cranes can move drums safely, provided beams, columns, and anchorages support maximum expected dynamic loads. This must include drum mass, rigging, any attachments, and impact factors from starting and stopping the lift. Engineering guidance highlights the need for these structural checks.
| Overhead Solution | Typical Application | Critical Checks | Best For… |
|---|---|---|---|
| Fixed hoist on runway beam | Repeated lifts in a straight line (e.g., unloading to a row of tanks) | Beam size and span, trolley load rating, end-stop strength | High-frequency lifts along a single bay, with predictable travel path |
| Jib crane (wall or column mounted) | Spot handling around workstations or sumps | Column capacity, anchor bolts, swing radius clearance | Serving drum racks, mixers, or dispensing stations within a 180–270° arc |
| Portable gantry crane | Temporary handling where no permanent structure exists | Wheel locks, floor flatness, frame bracing under side loads | Short-term projects, maintenance, or layout changes without civil works |
| Drum lifting beam / spreader | Keeping drums vertical and clear of interference | Lug weld quality, shackle and hook ratings, drum clamp compatibility | Lifting multiple drums or avoiding side loading on hoist hooks |
- Use purpose-built drum lifters: Rim clamps, vertical drum lifters, or grab hooks designed for chimes – this prevents shell crushing and bung damage.
- Verify all rating chains: Hook, shackle, sling, lifter, and hoist must each exceed the drum load – the weakest link sets your real capacity.
- Control swing: Keep lift height minimal and use tag lines – this reduces pendulum effects that can overload structures and strike people.
- Protect below-the-hook zone: Exclude personnel from the drop zone – this mitigates worst-case failure consequences.
Practical rigging checklist for 55-gallon drums
Before every overhead drum lift, confirm: the drum is structurally sound with no severe dents or corrosion; bungs or lids are tight; the rated capacity of hoist, trolley, and support structure exceeds the drum and rigging mass; below-the-hook devices are locked and fully engaged; and the travel path is clear of obstructions and personnel.
💡 Field Engineer’s Note: Dynamic effects from “bumping” the hoist control can easily add 20–30% to the apparent load. In older buildings, I always assume unknown beams are weaker than the hoist label suggests and bring in a structural check before approving repetitive drum lifts.
Storage layout, racking, and spill containment design
Drum storage layout, racking, and spill containment design must account for drum mass, stack stability, rack ratings, and regulatory sump capacity to prevent collapses and uncontrolled releases.
A typical 55-gallon drum can weigh 400–800 kg depending on liquid density, so storage systems must be designed for this range, not just the lower bound. Engineering guidance notes this typical weight range.
Industry practice limits floor-stacked rows to a maximum of two drums high and two drums wide to maintain visibility and avoid ladder use during inspections. Stacks higher than two drums increase instability due to variations in container strength, corrosion, and pallet patterns, with real risk of progressive collapse under impact or vibration. Pallet rack systems for drums require verified load ratings, bracing against seismic and impact loads, and decking or cradles that avoid point loading on chimes, which can deform shells or compromise bungs. Source: drum storage design practices.
| Storage Aspect | Good Practice | Engineering Rationale | Operational Impact |
|---|---|---|---|
| Floor stacking | Max 2 drums high × 2 wide | Limits instability from variable drum strength and pallet patterns | Allows inspections from floor level; reduces collapse risk from bumps |
| Pallet racking | Use rated racks with full decking or cradles | Prevents point loading on chimes and shell deformation | Supports long-term storage without slowly damaging drums |
| Ventilation | Low inlets, high exhaust, adequate air changes | Captures heavier-than-air vapors and lighter gases | Improves fire safety and worker exposure control |
| Indoor location | Away from heaters and hot surfaces | Reduces risk of heating flammable or toxic liquids | Complies with rules on not exposing drums to artificial heat sources |
Regulators require secondary containment for drums of flammable or toxic liquids. For 55-gallon (≈200 L) containers, one OSHA rule specifies that containers of 55 gallons or more must be surrounded by dikes or pans enclosing at least 35% of the total container volume. This requirement applies to containers of 55 gallons or more of flammable or toxic liquids.
For bulk storage, environmental rules also mandate spill containment capacity of at least 10% of the total stored liquid volume or 100% of the largest single container, whichever is greater, while some property protection standards specify 25% or the largest container. Designers often size sumps to meet the stricter criterion. Source: spill containment requirements.
- Size sumps for the worst rule: Use the higher of regulatory and insurance criteria – this prevents redesigns after audits.
- Design for abuse loads: Sumps and curbs must resist forklift impact and hydrostatic pressure – this preserves containment after real-world knocks.
- Use sloped floors and pump-out points: Grade floors into sumps with defined pump-out – this shortens cleanup time and reduces exposure.
- Provide fire protection nearby: Fire extinguishers suitable for the hazard must be ready for use – this aligns with OSHA expectations for drum storage areas.
Example: calculating minimum sump volume
If you store 20 drums of 200 L each (4,000 L total), 10% of total volume is 400 L. 100% of the largest single container is 200 L. Under a 10% / largest rule, you need at least 400 L. Under a 25% / largest rule, you need at least 1,000 L. In practice, you would design for ≥1,000 L plus freeboard for firewater and rainfall if outdoors.
💡 Field Engineer’s Note: The most common failure I see is beautiful new drum racks installed over undersized, flat floors with no real containment. Before buying racking, fix the floor slopes and sump volumes; it is far cheaper than retrofitting civil works around live storage later.
Operational Practices From Unloading To Recycling
Operational practices for 55-gallon drums must control impact, rolling, heat, and pressure from the moment drums leave the truck until final recycling or disposal. Done correctly, they cut injuries, leaks, and lifecycle cost while keeping you compliant.
When people search for how to handle 55 gallon drums, they usually need a full workflow: safe unloading, controlled internal transport, compliant storage, and legal end-of-life handling. This section walks that path step by step.
Truck unloading, transfer routes, and traffic control
Safe unloading of 55-gallon drums depends on controlled vertical movement, stable rolling or wheeled transfer, and clear separation from other traffic. The aim is to avoid uncontrolled momentum and side impacts on thin drum shells.
- Use controlled vertical handling: Lift-gates, hoists, or skids – Prevents drops that can shear bungs or crease shells.
- Secure the vehicle first: Brakes set and wheels chocked – Eliminates truck movement while drums are on skids or lift-gates.
- Fix skids to the bed: Attach wood/metal skids securely – Stops skids shifting and launching drums.
- Maintain direct control: No free-rolling or free-skidding drums – Prevents runaway drums on sloped docks or yards.
- Move off the dock quickly: Transfer straight to storage or staging – Reduces congestion and impact risk at the dock face.
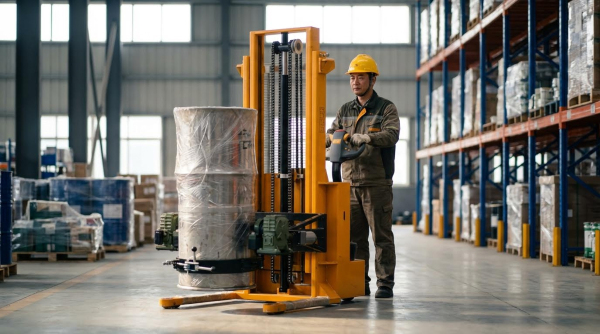
Once drums are on the ground, use drum-rated equipment instead of brute force. Fork trucks, drum trucks, or handlers keep the 180–360 kg mass stable and under control during transfer. Unloading guidance emphasizes moving drums with fork trucks on pallets or with drum carts where forklifts are unavailable.
| Activity | Preferred Method | Key Controls | Operational Impact |
|---|---|---|---|
| Vertical unloading from truck | Hydraulic lift-gate or hand-winch hoist | Brakes set, wheels chocked, trained operator | Prevents drops from 1–1.5 m platform heights. |
| Unloading via skids | Wood/metal skids fixed to bed | Two-person control, no free sliding | Allows unloading where no lift-gate exists. |
| Dock-to-storage transfer | Fork truck + palletized drums | Drums secured, smooth route | Moves multiple drums safely in one trip. |
| Short internal moves | Barrel lifter / drum handler | Two-person team for rolling | Reduces strain in tight indoor areas. |
Why “no free-rolling” is critical
A 250 kg drum rolling at walking speed carries enough kinetic energy to crush feet or punch through a corroded shell. Direct control lets you stop that energy before it finds a weak point.
Traffic control is as important as the handling tools. Drum routes should not cross busy pedestrian walkways or narrow blind corners where fork trucks, pallet jacks, and people mix.
- Define drum corridors: Painted or barriered lanes – Keeps heavy moving drums away from office and welfare areas.
- Control gradients: Avoid slopes where drums could roll – Prevents runaway drums if equipment fails.
- Set speed limits: Low speeds for fork trucks in drum zones – Gives drivers time to react to leaks or obstructions.
- Sign critical crossings: Mirrors and stop lines at blind corners – Reduces collision risk between trucks and drum carts.
💡 Field Engineer’s Note: If you must use skids on a slight slope, align the skid with the fall and position a physical stop (timber block or dock curb) at the lower end. Relying on boot friction alone to stop a 300 kg drum is a lost fight.
Indoor and outdoor storage conditions and fire safety
Indoor and outdoor storage for 55-gallon drums must control moisture, temperature, and ignition sources while maintaining access for inspection and firefighting. Good layout lowers both spill risk and maintenance cost.
For indoor storage, a dedicated room or zone works best. Centralizing drums improves inventory control and reduces handling miles. Indoor storage guidance recommends designated areas with proper racking, hoists, and clear access to each drum.
- Use dedicated indoor areas: Central drum room or lube store – Simplifies stock control and spill response.
- Protect with racks/shelving: Drum-rated racks with hoists – Prevents tip-over and crush injuries during retrieval.
- Avoid heat sources: No drums near steam lines or heaters – Reduces pressure build-up and fire risk.
- Apply FIFO rotation: First-in, first-out stock movement – Prevents product degradation and off-spec use.
For outdoor storage, the mechanical risks shift to corrosion, water ingress, and environmental exposure. Outdoor storage recommendations emphasize shelter, elevation above ground, and careful bung orientation to keep water out.
| Condition | Recommended Practice | Risk Controlled | Best For… |
|---|---|---|---|
| Rain and snow | Temporary shelter or waterproof tarpaulin | Rust, label loss, water-contaminated contents | Small outdoor drum pads or overflow storage. |
| Ground moisture | Blocks or racks above ground | Bottom corrosion and stuck drums | Gravel or unpaved yards. |
| Bung sealing | Drums on side, bungs horizontal | Breathing in moisture through bung | Long-term lubricant storage. |
| Max protection | Drums on end, bung end down | Standing water on bung | High rainfall or snow-melt regions. |
Where drums contain flammable or toxic liquids, storage must also meet regulatory controls on heat exposure, physical protection, and secondary containment. OSHA requires that such drums not be stored where exposed to open flame, hot metal, or other artificial heat sources. It also requires barriers or guards for containers of 30 gallons (≈114 L) or more to prevent external impact, and secondary containment around 55-gallon (≈200 L) containers equal to at least 35% of total volume. OSHA 1915.173 also requires suitable fire extinguishers near drum storage.
- Keep away from heat: No drums near burners, weld bays, or hot metal – Prevents pressure rise and ignition.
- Install barriers/guards: Guard rails or bollards in traffic areas – Stops forklifts or trucks striking drum rows.
- Provide secondary containment: Dikes or pans ≥35% of stored volume – Limits spread of leaks and firewater.
- Stage extinguishers: Fire extinguishers sized for the liquids – Allows fast first response to incipient fires.
Indoor vs. outdoor: which is safer?
Indoor storage offers better temperature and moisture control but concentrates fuel load. Outdoor storage spreads risk but increases corrosion and environmental exposure. The safest choice depends on product hazard, climate, and available containment.
💡 Field Engineer’s Note: In mixed-use plants, I often see drums parked “temporarily” near boilers or heaters. Treat any drum within 1–2 m of a hot surface as a red-flag; radiant heat can quietly build internal pressure over a shift.
Drum emptying, pressurization rules, and waste handling
Emptying and disposing of 55-gallon drums must avoid internal pressurization, control residual hazards, and document the waste stream. This is where many facilities fail when they look up how to handle 55 gallon drums.
From an engineering and safety standpoint, forcing product out by pressurizing the drum is unacceptable. OSHA explicitly prohibits pressurizing shipping drums and containers to remove contents. Any temporary pressurized piping system that conveys hazardous liquids or gases must include a relief valve and by-pass to prevent rupture and release. OSHA 1915.173 sets these requirements.
- Never pressurize drums: No compressed air into drum bungs – Avoids catastrophic shell or bung failure.
- Use gravity or pumps: Drum pumps, tilters, or decanters – Controls flow without stressing the container.
- Fit relief on temp systems: Relief valve and by-pass – Protects hoses and fittings from overpressure.
Preferred methods for drum emptying
Use manual or powered drum pumps through the bung, or place drums in a tilter/rocker to feed by gravity into a closed transfer line. Both methods limit splash, vapors, and mechanical stress on the drum.
Once “empty,” a drum still contains residues that may be hazardous. Recycling or disposal starts with correct classification. Facilities should confirm whether residues are hazardous before choosing a treatment path, verifying labels and Safety Data Sheets and treating unlabeled drums as hazardous until testing closes gaps. Clean, non-hazardous drums can be reconditioned, scrapped, or recycled; steel drums may be reconditioned or scrapped after documented cleaning, and high-density polyethylene drums can be shredded and reprocessed into other products. Many regulators require triple-rinsing, puncturing at multiple heights, and label removal before waste centers or plastics recyclers accept drums. Recycling and disposal protocols describe these steps.
| Stage | Key Action | Why It Matters | Operational Impact |
|---|---|---|---|
| Classification | Check label, SDS, and history | Determines if waste is hazardous | Affects transport rules and disposal cost. |
| Cleaning | Triple-rinse (where allowed) | Removes free liquids and residues | Enables recycling instead of hazardous disposal. |
| Physical rendering | Puncture at multiple heights | Prevents reuse and trapped pressure | Reduces explosion risk in scrap streams. |
| Documentation | Record contents, cleaning, generator | Proves compliance to regulators | Speeds acceptance at recyclers or waste centers. |
Where drums still contain hazardous chemicals, fuels, or regulated waste, stricter transport and treatment rules apply. Licensed waste transporters may be required once load mass or hazard category exceeds thresholds, and waste centers often reject drums with free liquids unless the contents are solidified or over-packed in certified containers. End-of-life handling guidance highlights the need for proper documentation and treatment.
- Use licensed transporters: For hazardous or bulk loads – Ensures correct placarding, routing, and manifests.
- Eliminate free liquids: Solidify or over-pack as required – Prevents leaks in transit and at the waste site.
- Keep full records: SDS, cleaning method, generator data – Reduces rejection and rework at disposal facilities.
💡 Field Engineer’s Note: Many plants focus on handling full drums but neglect “empties.” Treat every “empty” as a pressurized or contaminated vessel until it is opened, vented, rinsed, punctured, and documented; most near-miss drum explosions I investigated involved so-called empties.

Final Considerations For Compliance And Total Cost
Safe 55-gallon drum handling depends on one integrated system, not isolated fixes. Geometry, mass, and center of gravity define what people can never do safely by hand. Engineering controls then take over, using drum trucks, handlers, forklifts, and overhead systems that keep 180–360 kg loads stable and predictable.
Storage design and containment convert that stability into long-term security. Correct stacking, rated racking, and right-sized sumps prevent slow damage, sudden collapse, and uncontrolled spills. Operational rules close the loop. They govern unloading, traffic, temperature, and drum emptying so no one improvises with free-rolling drums, heat, or internal pressure.
When you align these elements with OSHA and environmental rules, you cut injuries, leaks, and fire risk while also reducing rework and clean-up cost. The best strategy is simple: ban brute-force handling, treat every unknown drum as hazardous, and make mechanical aids and containment the default. Standardize routes, equipment, and end-of-life steps, and audit them often.
Teams that follow this approach turn drum handling from a chronic hazard into a controlled, low-incident process. Atomoving drum handling solutions fit naturally into this framework, helping you move, store, and empty drums with less strain, fewer failures, and lower lifecycle cost.
Frequently Asked Questions
How to move a 55 gallon drum by hand?
To move a 55-gallon drum by hand, place your hands near the chime at shoulder width. Move your shoulders low and close to the drum. Slowly push forward with your legs until you feel the drum reach its balance point. This technique ensures safe handling and reduces strain on your body. USDA Drum Handling Guide.
What to do with 55 gallon plastic drums?
If you need to dispose of 55-gallon plastic drums, contact local waste management authorities or recycling centers for proper disposal methods. They can guide you on whether the drums can be recycled or if they need to be sent to specialized facilities. For hazardous waste, ensure the drums are labeled and separated before contacting a professional disposal service like eWaste Disposal. Plastic Drum Recycling Info.
How long will a 55 gallon drum last?
The lifespan of a 55-gallon drum depends on its usage and material. A well-maintained steel drum can last several years, while plastic drums offer durability in corrosive environments. Regular inspections and maintenance can extend their service life significantly. Drum Lifespan Guide.