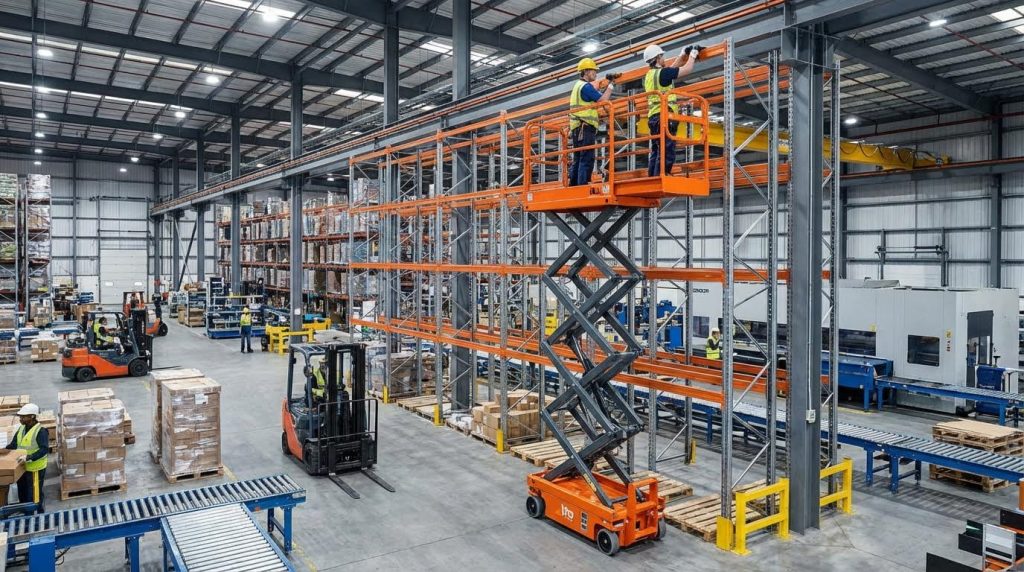
If you are asking “how do I reset my scissor lift”, the safest answer starts with understanding the machine’s power-up logic, interlocks, and fault codes. This guide explains what you can reset yourself, which checks to do first, and when a technician must take over. You will see how electrical, hydraulic, and sensor faults behave in the real world so you can protect people, equipment, and uptime. Always follow your specific operator’s manual and site safety rules before applying any procedure described here.
Understanding Scissor Lift Resets And Safety Logic

Understanding reset logic means knowing how the lift powers up, how safety circuits latch or block movement, and why simply cycling the key is not always a safe “fix.” If you are asking “how do I reset my scissor lift,” start by respecting these built‑in rules before touching any button.
How the power-up and reset sequence works
The power-up and reset sequence on a scissor platform follows a strict order so the control system can verify power, controls, and sensors before it allows any motion. If you skip steps or power up out of order, you often create nuisance faults instead of clearing them.
- Main battery / isolation switch: This must be turned on before any control circuit can energize – without it, the control panel stays “dead” no matter how often you try to reset.
- Key switch to base (ground) controls: Turning the key to the ground position assigns priority to the chassis controls – this lets you prove basic up/down before using the platform. Power-up sequence reference
- Indicator and battery check: Confirm status lights, battery level, and that emergency stops are pulled out – many “faults” are simply an engaged E‑stop or low battery lockout.
- Base raise/lower test: Use the chassis raise/lower buttons to confirm vertical motion – this proves that main power, contactors, and hydraulics are live before you move to platform controls.
- Switching to platform controls: Turn the key to the platform position so the upper console takes priority – this is the only way the joystick/enable logic will respond.
- Enable + joystick logic: Hold the enable button while moving the proportional bar or joystick – without the enable signal, the ECU sees your input as invalid and blocks motion. Platform control logic
- Drive vs lift selection: Use the dedicated drive button before you try to travel – this separation of lift and drive helps isolate which circuit is actually at fault.
When people search “how do I reset my scissor lift,” most of the time the “reset” is simply restoring this correct power-up order and clearing any overlooked E‑stop or key position error, not forcing the machine past a real fault.
Typical quick-reset checklist (before calling a technician)
- Step 1: Turn main battery / isolation switch fully off, wait 30–60 seconds, then turn it back on – this discharges some control electronics and clears transient errors.
- Step 2: Confirm all Anderson-style connectors and battery cables are fully seated and undamaged – loose power or ground gives “dead” controls even after cycling power. Power path checks
- Step 3: Set key to ground controls and confirm you can raise/lower from the base – if base works but platform does not, the issue is in the upper control circuit.
- Step 4: Move key to platform, pull out all E‑stops, then hold enable and move the joystick slowly – fast, jerky movements can trigger interlocks or tilt/overload sensors.
💡 Field Engineer’s Note: If you power up with someone already leaning on the joystick or standing on the enable, many ECUs treat that as a faulted input and refuse to move. Always make sure every control is in its neutral position before you turn the key or re-energize after a battery change.
Emergency stop, descent, and zero-position rules
Emergency stop, emergency descent, and “zero-position” rules exist so the lift never surprises you with unexpected motion after a reset. You must always clear E‑stops, return controls to neutral, and lower safely before you treat any fault as “fixed.”
- Emergency stop behaviour: Hitting an E‑stop cuts the control circuit and often the main power relay – this instantly disables lift and drive, even though batteries still hold energy. Emergency stop logic
- Resetting after E‑stop: You must release every E‑stop, then cycle the key or main switch if required – some controllers will not re-arm until they see a full power cycle after an E‑stop event.
- Zero-position requirement: All joysticks, levers, and buttons must be in neutral when power is restored – this prevents the lift from moving the instant you re-energize the circuit.
- Emergency descent from platform: Use the manufacturer’s emergency lowering control to bring the platform down under controlled hydraulic flow – this is for loss of normal control, not for bypassing active faults.
- Manual lowering at the base: Ground personnel can operate a manual lowering valve on the hydraulic manifold – this allows safe descent during power loss or ECU failure when the platform controls are dead. Manual lowering reference
- Post-descent inspection: After any emergency or manual descent, a competent person must inspect hydraulics, electrics, and sensors – treat the event as a fault, not as “normal use,” before putting the lift back in service.
Why “zero position” matters when you reset
Zero-position logic means the ECU checks that all motion commands are at rest before it enables outputs. If a joystick is slightly off-center or an enable switch is stuck, the controller may log a fault and refuse to move after power-up. This is why, when people ask “how do I reset my scissor lift,” the safest first step is to visually and physically confirm every control is centered and every E‑stop is released before cycling power.
💡 Field Engineer’s Note: After an emergency descent, do not just turn the key back on and “see if it runs.” Log the event, lock out the machine, and have a technician confirm that the E‑stop wasn’t masking a hydraulic leak, tilt sensor problem, or overload condition that will come straight back on the next cycle.
Diagnosing Common Faults Before You Attempt A Reset
Diagnosing common faults before you attempt a reset ensures you fix the real cause instead of masking it, which is the safest answer to “how do I reset my scissor platform lift” in practice. Always verify power, controls, hydraulics, and load conditions methodically before touching any reset or power-cycle sequence.
- Start with symptoms: Note exactly what works and what does not – this narrows faults to power, controls, hydraulics, or sensors.
- Confirm safe state: Platform lowered, area clear, maintenance props or safety pawls engaged – prevents crush and entrapment risks while testing.
- Follow OEM flow: Work from battery and main switch through to ECUs and sensors – avoids random parts swapping and missed root causes.
- Use codes and meters: Read fault codes and confirm with voltage/continuity checks – turns “no start” problems into traceable circuits.
- Stop at your competence limit: Call a qualified technician for ECU, hydraulic, or structural issues – protects both people and equipment.
💡 Field Engineer’s Note: If you are repeatedly asking “how do I reset my scissor platform” for the same fault, stop. Recurring trips usually mean a marginal battery, damaged harness, or mis-calibrated sensor that needs a technician, not another key cycle.
No power, no response, or dead control panel
A scissor lift that shows no lights, beeps, or display after key-on almost always has a primary power path problem, not a “reset” problem. Work from the battery outward before assuming any ECU failure.
- Verify battery isolation and main power switch: Ensure the battery isolation and main power switches are on so the control circuit can energize. A wrong switch position mimics a major electrical fault. Power-up sequence and checks
- Check key switch position: Confirm the key is in the correct base or platform position and not in “off”. Incorrect selection leaves one console completely dead. Key switch logic
- Inspect Anderson connectors and battery cables: Look for loose plugs, corrosion, or damaged lugs at the main connectors and battery terminations. An open or high-resistance joint kills the whole system. Connector and cable checks
- Confirm positive and ground continuity: Use a meter to verify both positive and negative paths from battery to ECU. An open ground gives the same “dead” symptom as an open positive feed. System dead diagnostics
- Check fuses and main relays after voltage is present: Only after you see correct supply voltage at the ECU input should you test and replace fuses or main contactors. This prevents unnecessary ECU swaps. Fuse and relay checks
How this ties back to “how do I reset my scissor lift”
A power-cycle or ECU reset will not revive a lift with a flat battery, open Anderson connector, or blown main fuse. You must restore a solid 24 V or 48 V supply path first, then follow the manufacturer’s reset or power-up sequence.
💡 Field Engineer’s Note: If the lift wakes up when you wiggle the main connector or battery leads, log it as an electrical defect and tag the machine out. Intermittent power loss at height is far more dangerous than a lift that simply will not start.
Platform controls, travel logic, and enable circuits
When the base works but the platform controls or drive functions do not, the fault usually lies in enable circuits, joysticks, or communication between the upper console and the lower ECU. Treat each function (lift, drive, steer) as a separate path.
- Confirm key switch priority to platform: Ensure the key switch is set to the platform console when you expect upper controls to work. Wrong priority makes the platform appear dead while the base works normally. Platform control assignment
- Check enable button and joystick sequence: Most lifts require a dedicated enable button plus joystick movement for lift and drive. If the enable switch is faulty or not fully pressed, the ECU ignores joystick commands. Enable and proportional control logic
- Verify emergency stop release at both consoles: Make sure all E‑stops are pulled out. A single pressed E‑stop in series breaks the control circuit and blocks all motion. Emergency stop behavior
- Investigate communication fault codes (e.g., “02 failure”): Repeated communication errors between handle and lower ECU often come from fatigued wires, partially seated plugs, or broken conductors in the harness. Moving the harness while watching the code helps localize hidden breaks. Communication error diagnosis
- Check limit, enable, and E‑stop contacts dynamically: A switch can look fine on a static meter test yet fail under movement. Weak springs or oxidized contacts cause intermittent “input seen, no output” issues. Control input but no motion
- Differentiate between missing command and actuator fault: Use a meter to see if the ECU actually sends an output when you command drive or lift. If the command is present but no motion occurs, the problem is downstream in motors, valves, or wiring. Using multimeters with OEM codes
Drive and steering symptom checklist
If the lift will raise but not drive, focus on drive-enable, drive button, and travel-speed logic. If it will drive but not raise, concentrate on lift-enable circuits, lift motor contactor, and hydraulic faults. This split approach speeds up fault isolation and prevents random resets that do nothing.
💡 Field Engineer’s Note: Many operators try a “reset” when the real problem is a half-pressed E‑stop or a tired enable switch. Train crews to deliberately check E‑stops and enables before touching any key or battery isolator.
Hydraulic, sensor, and overload-related shutdowns
Hydraulic problems, bad sensor feedback, or overload conditions often cause scissor lifts to stop mid-cycle or refuse to lift, even though electrics seem normal. In these cases, a reset without fixing the underlying pressure, oil, or sensor issue is unsafe.
- Listen and look for hydraulic distress: Abnormal pump noise, foamy oil, or visible leaks point to cavitation, low oil, or blocked strainers. Continuing to run risks rapid oil heating and seal failure. Hydraulic fault indicators
- Check for jerky or jumping lift motion: Jerky movement usually indicates low oil, clogged filters, or air in the circuit. Corrective actions include topping up, cleaning filters, and bleeding air before returning the lift to service. Common hydraulic lift faults
- Respect load and relief-valve limits: Verify the actual platform load is within the rated kg capacity, then check that relief valve pressure matches OEM spec. Overload or low relief setting causes stalls and “OL” or overload alarms. Load and relief valve checks
- Assess mechanical alignment and friction: Misaligned scissor arms or tight slideways increase friction and required lifting force. Guidelines call for around 1.5–2.5 mm clearance between slideways for smooth motion; bent members or dry guides trigger overload symptoms. Mechanical alignment guidance
- Interpret tilt and overload alarms correctly: Frequent tilt alarms on level ground suggest a faulty or mis-calibrated inclination sensor, while overload alarms with no load point to pressure or angle sensor errors. Both require measurement and recalibration on a known level, unloaded condition. Sensor and limit switch diagnostics
- Inspect for external and internal leaks: Wet hoses, misting fittings, or slow platform creep at height signal external or internal cylinder leakage. Both must be corrected before the lift is used again to avoid sudden loss of height. Leak and descent checks
When NOT to reset after a hydraulic or sensor fault
Do not attempt any reset or restart if the platform has just been lowered using emergency descent, if you see fresh oil on the floor, or if a tilt or overload alarm persists on apparently correct ground and load. In these cases, the only safe step is to tag the machine out and call a qualified technician.
💡 Field Engineer’s Note: If the lift stopped because a tilt or overload sensor did its job, forcing a reset to “get one last job done” is how tip-overs and structural failures happen. Treat every unexplained shutdown as a safety system doing exactly what it was designed to do.
When A Simple Reset Is Not Enough: Technician Intervention
This section explains when you must stop asking “how do I reset my scissor lift” and instead lock out the machine and call a qualified technician. If basic power, key, and emergency-stop checks do not restore normal, smooth operation, you are likely facing deeper electrical, ECU, or hydraulic faults that require trained intervention and proper test equipment.
- Golden rule: One clean reset attempt is enough – if the same fault returns, treat it as a defect, not a nuisance.
- Lock-out/tag-out: Isolate power and tag the machine when motion is abnormal – prevents crush, tip, and entrapment incidents.
- Stop at unknown fault codes: Do not “trial and error” with random resets – avoids damaging ECUs and wiring.
- Escalate for leaks or jerks: Any jerky lift, creeping platform, or visible oil must be investigated – these are system faults, not user errors.
💡 Field Engineer’s Note: If you need to reset the same fault more than once per shift, you don’t have a reset problem, you have a reliability problem. Escalate it before someone learns the hard way why the interlock exists.
Electrical and ECU communication fault indicators
Electrical and ECU communication faults show up as dead controls, recurring error codes, or functions that only work when you wiggle harnesses, and these conditions demand a technician rather than more reset attempts. When you are searching “how do I reset my scissor lift” and see these symptoms, the safest action is to power down, secure the lift, and request service.
- System totally dead: No indicators, no ECU/PCU display, no response – likely a primary power path or ground failure, not a simple reset issue.
- Frequent communication errors: Repeated “02 failure” or similar codes after startup – points to intermittent wiring or connector faults between platform handle and lower ECU.
- Inputs seen, but no motion: Joystick or switches seem OK, but no lift/drive – suggests enable circuits, limit switches, or ECU I/O problems.
- Fault clears then returns: Code disappears after cycling power but comes back under movement – indicates vibration-sensitive wiring or terminal issues.
Technicians follow a structured electrical path from the battery to the control electronics instead of repeatedly cycling the key switch. For a dead system, they inspect the main power switch, Anderson connector, key switch, and battery terminations, then verify both positive and ground continuity to the ECU before considering controller replacement. Structured power-path checks reduce unnecessary ECU swaps.
Intermittent “02 failure” or similar communication alarms usually trace to fatigued spring wires in the platform control unit, partially seated plugs, or broken conductors inside the main harness. Technicians gently flex the harness while watching the fault code to localize hidden breaks, then clean, re-crimp, or replace affected sub-harnesses and confirm firmware/configuration compatibility. This process targets the real cause instead of masking it with resets.
When to stop DIY electrical checks and call service
If you have already checked battery charge, main power switch, key switch position, and emergency stops, but the lift still shows dead controls, repeated communication codes, or motion loss when you move the platform, you have moved beyond simple operator troubleshooting. At this point, further “how do I reset my scissor lift” attempts risk defeating safety circuits or overheating components; lock out the unit and log a service request.
| Electrical Symptom | Likely Root Cause Area | Why Reset Is Not Enough | Operational Impact |
|---|---|---|---|
| No indicators, no ECU display | Main switch, connector, power/ground wiring | Open circuit must be located and repaired | Machine unavailable; unsafe to rely on intermittent power |
| Recurring communication error (e.g., “02 failure”) | Harness between platform controls and lower ECU | Intermittent conductors/terminals need replacement | Random loss of lift/drive during use; high incident risk |
| Controls appear OK, but no lift/drive | Enable circuits, limit switches, ECU I/O | Logic or contact faults require diagnostic tools | Unpredictable response; cannot trust safety interlocks |
| Fault clears after power cycle, then returns | Vibration-sensitive wiring or internal ECU defect | Underlying defect persists despite resets | Lift may fail mid-task at height or in traffic paths |
Effective technicians do more than clear codes: they use digital multimeters and OEM diagnostics to see if the ECU is actually issuing commands and whether voltage collapses under load. They measure voltage drops across connectors during motor start, verify control outputs, and separate upstream control faults from downstream motor or valve issues. This is work for trained personnel, not for repeated operator resets.
💡 Field Engineer’s Note: If wiggling the platform cable makes the lift work “for now,” park it out of service. That same broken conductor can fail completely while you are 8–12 m in the air with no drive or descent.
Hydraulic instability, leaks, and abnormal motion
Hydraulic instability, visible leaks, jerky motion, or unexplained platform creep are red flags that a reset will not fix, because they indicate real mechanical or fluid problems. If your “how do I reset my scissor lift” attempt restores power but the platform still jumps, sags, or leaves oil on the floor, you must stop using the machine and call a technician.
- Jerky or pulsating lift: Platform jumps or surges instead of moving smoothly – often due to low oil, air in the system, or blocked filters.
- Abnormal noise or fast heating: Loud pump whine or rapid oil temperature rise – signals cavitation, internal leakage, or overloaded operation.
- Visible external leaks: Oil on hoses, cylinders, or under the lift – creates slip hazards and indicates loss of containment.
- Platform creep or failure to hold height: Lift slowly sinks with no command – suggests internal cylinder leakage or valve bypass.
Hydraulic faults often start with sound and temperature changes before outright failure. Excessive pump noise can indicate low oil level, aerated fluid, or a blocked suction line, while rapid temperature rise points to stuck valves or internal leakage across cylinders. Any of these conditions reduces efficiency and can quickly damage seals if the lift continues in service. Operators should stop the machine and request inspection at the first signs of abnormal hydraulic noise or heat.
Jerky lifting, especially under moderate load, frequently traces to low hydraulic oil, clogged suction or return filters, or air trapped in the circuit. Corrective actions include refilling with clean oil of the specified viscosity, cleaning or replacing filters, and bleeding air from cylinders and lines. These tasks require correct tools, safe support of the structure, and knowledge of the manufacturer’s procedure, so they fall squarely into technician territory. Repeatedly cycling the lift in the hope that it “works itself out” only circulates contaminated or aerated oil and worsens wear.
| Hydraulic Symptom | Probable Technical Cause | Why Reset Is Not Enough | Operational Impact |
|---|---|---|---|
| Jerky or jumping lift | Low oil, air in lines, clogged filters, misaligned scissor pack | Requires oil service, bleeding, and alignment checks | Difficult to position at height; risk of load shift and operator instability |
| Loud pump whine, rapid oil heating | Cavitation, stuck valves, internal leakage | Needs hydraulic diagnostics and component repair | Shortens component life; may lead to sudden loss of lift |
| Visible leaks at hoses, fittings, cylinders | Damaged hoses, loose fittings, seal failure | Physical repair and cleanliness controls required | Slip hazards, environmental contamination, loss of safe load capacity |
| Platform slowly creeps down | Internal cylinder bypass or valve leakage | Demands pressure and leakage testing | Unreliable work height; potential crush risk under structures |
Mechanical load and alignment issues also sit beyond what a reset can solve. Excessive platform load or incorrect pressure relief settings can cause stalls or incomplete elevation, while misaligned slideways and scissor arms increase friction and trigger overload alarms. Technicians verify actual load against rated capacity, adjust relief valves within the manufacturer’s pressure limits, and check slideway clearances (typically around 1.5–2.5 mm) to restore smooth motion. These adjustments need calibrated gauges and should never be attempted as DIY tweaks.
Red-flag hydraulic conditions that require immediate lock-out
Lock out and tag the lift, then call a technician, if you notice any of the following: oil on the floor or tyres; the platform bouncing or surging when raising or lowering; the lift creeping down without command; strong burnt-oil smell or hot reservoir after short use; or any loud new whining or grinding noise from the power unit. No reset sequence can safely compensate for these defects.
💡 Field Engineer’s Note: A scissor lift that “only” creeps down 10–20 mm per minute is already unsafe under ductwork or steel. That slow leak is your early warning; treat it as a failed component, not a minor annoyance.
Final Checks, Compliance, And Long-Term Reliability
Final checks after any reset confirm that your scissor platform is safe, compliant, and ready for long-term reliable use, not just temporarily working. This is the missing step many operators skip when asking “how do I reset my scissor lift” safely.
- Confirm all emergency stops are released: Walk around and physically twist/pull every E‑stop to the run position – prevents chasing a “fault” that is actually just a latched stop button.
- Verify normal emergency descent operation: Test powered lowering and the emergency descent or manual lowering valve from ground controls – ensures you can always get the platform down during future failures.
- Check for hydraulic leaks and abnormal motion: Inspect cylinders, hoses, and fittings for oil, then raise and lower through full stroke – catches creeping, jerky motion, or structural issues before they become incidents.
- Re-check load and tilt alarms: With the platform empty on level ground, confirm overload and tilt alarms stay off – verifies sensors and safety logic are behaving as designed.
- Cycle both ground and platform controls: Prove that lift, lower, drive, and steer all respond correctly from both stations – confirms correct priority logic and that no enable circuit is bypassed.
- Record the fault and reset in your log: Note codes, symptoms, and what you did to reset – builds a maintenance history that helps technicians diagnose recurring issues faster.
How this ties into “how do I reset my scissor lift”
Resetting is not only key-switches and power cycling. A safe reset ends with a documented function test, leak check, and sensor verification so the next operator receives a compliant, predictable machine.
Regulatory and manufacturer compliance is what turns a quick reset into a legally defensible maintenance action. You must treat every post-reset check as if an inspector or investigator will review it later.
- Follow the OEM manual sequence: Always restore power, controls, and test cycles exactly as described in the operator and service manuals – this aligns your reset with the design assumptions of the control system.
- Lock-out/tag-out for maintenance: When a fault cannot be cleared by normal reset, isolate and tag the machine out of service – prevents someone else from “just trying it” and getting hurt.
- Respect rated capacity in kg: After a reset, verify the platform is not overloaded with people, tools, or materials – overload can re-trigger faults or mask underlying hydraulic or structural problems.
- Keep the lift on firm, level ground: Confirm stabilizers, outriggers, or leveling devices are correctly deployed and locked – tilt-related shutdowns and nuisance alarms usually disappear on properly prepared ground.
- Do not clear safety devices to “get it working”: Never bypass tilt switches, overload sensors, or emergency stops to complete a reset – this turns a simple repair into a serious safety violation.
💡 Field Engineer’s Note: If you need more than one “hard reset” (isolation off, wait, power on) per shift to keep the lift running, you do not have a reset problem—you have a developing electrical or hydraulic fault that needs a technician and formal troubleshooting.
Long-term reliability depends less on clever reset tricks and more on consistent inspection and preventive maintenance after faults. Every time you ask “how do I reset my scissor lift,” you should also ask “what caused this, and how do I stop it coming back?”
- Inspect wiring and connectors near moving joints: Look for chafed insulation, tight bend radii, and stretched harnesses at scissor pivots – these are classic sources of intermittent ECU and communication faults.
- Monitor for repeated fault codes: If the same code appears again after a correct reset and test, escalate – recurring codes usually indicate sensor drift, loose terminals, or internal ECU issues.
- Standardize daily function checks: At the start of each shift, run a quick, documented lift/drive/steer test – this catches problems early, before they strand someone at height.
- Plan periodic deep inspections: Schedule structured checks of cylinders, pins, slideways, and bushings – mechanical wear often shows up first as “mysterious” overload or stability alarms.
- Train operators on fault indicators, not just driving: Make sure they can recognize and report specific lights, buzzers, and codes – clear feedback shortens diagnostic time for technicians.
When to stop resetting and call a technician
Stop attempting resets and remove the lift from service if you see repeated communication faults, unexplained movement, hydraulic creep, burning smells, or visible structural damage. At that point, only a qualified technician using the correct procedures and test equipment should continue.

Final Checks, Compliance, And Long-Term Reliability
Safe scissor lift resets depend on more than knowing which switch to cycle. The power-up sequence, emergency stop logic, and zero-position rules all exist to stop unexpected motion and protect people at height. When operators follow this logic step by step, most “faults” resolve as simple power, key, or E‑stop errors rather than real failures.
However, dead controls, recurring ECU codes, jerky motion, leaks, tilt or overload alarms, and platform creep all signal real defects. In these cases, further resets increase risk. The correct action is to lock out the lift, document the symptoms, and hand over to a technician who can test power paths, harnesses, hydraulics, and structural alignment with the right tools.
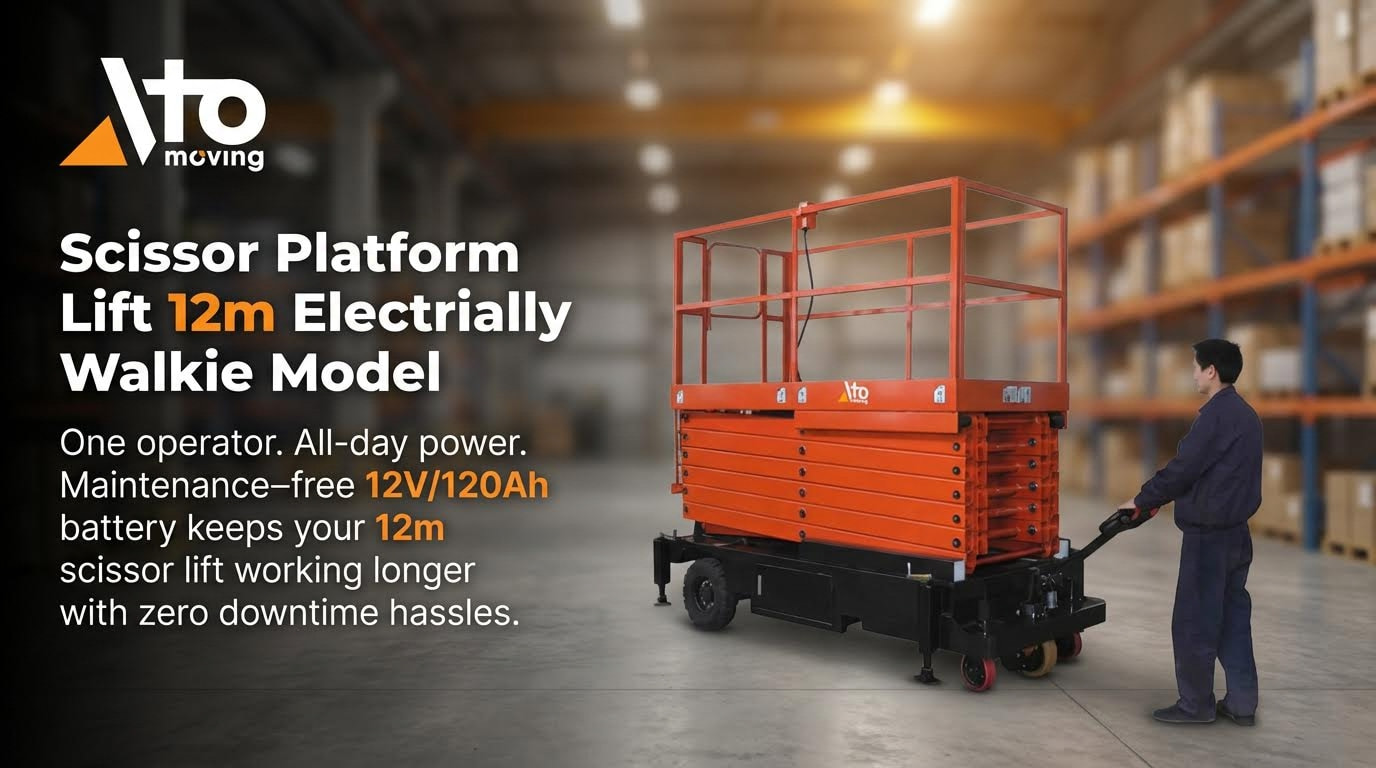
Operations teams should treat every reset as a controlled maintenance event. Always finish with full function tests from both control stations, leak and motion checks, and verification of tilt and overload protection on level ground. Record each incident and its cause. Over time, this data supports better preventive maintenance, fewer breakdowns, and longer service life for Atomoving platforms.
The best practice is clear: use resets only to confirm that a correctly configured, undamaged lift is ready to work. When in doubt, stop, secure the machine, and call a qualified technician before anyone leaves the ground.
Frequently Asked Questions
How do I reset my scissor lift?
To reset your scissor lift, first ensure the platform is free of any weight. Then, push in and pull out the red Emergency Stop button to reset the system. If the platform remains overloaded, the warning light will continue to flash. Scissor Lift Manual.
What should I do if the scissor lift doesn’t reset?
If the scissor lift does not reset using the Emergency Stop button, try lowering the lift completely. On the control pad, press and hold the down arrow until the lift reaches its lowest point. Continue holding the button for 10 seconds, then release to reinitialize the lift. Lift Reset Instructions.

